🍮 Best Caramel Tart Recipe Ever
👩🍳 The Busy Home Cook's Arsenal
Consistently cooking incredible meals for your family doesn't mean spending three hours in the kitchen every night. These are the 5 absolute life-saving appliances and culinary tools that dramatically cut down prep time while guaranteeing restaurant-quality results.
🌪️ Ninja 4-Quart Air Fryer
The machine that completely changed weeknight dinners. It preheats in seconds and cooks frozen vegetables, chicken wings, and battered fish to an incredibly crispy, deep-fried texture using 75% less oil and taking half the time of a traditional oven.
⏱️ Instant Pot Duo 7-in-1 Pressure Cooker
Forget slow cookers that take 8 hours. This legendary appliance aggressively pressure cooks tough cuts of meat into melt-in-your-mouth tender roasts, stews, and perfectly fluffy rice in under 45 minutes, saving you when you forget to defrost dinner.
🔪 Victorinox Fibrox Pro 8" Chef's Knife
A dull knife is dangerous and makes chopping vegetables a miserable chore. This exact blade reigns supreme in professional kitchens because it holds a terrifyingly sharp edge, features a non-slip grip, and costs significantly less than heavy German steel.
🌡️ ThermoPro Instant Read Thermometer
The secret difference between dry, rubbery chicken and juicy perfection. Stop nervously slicing your proteins open to check if they're done—this waterproof digital pen gives you a highly accurate temperature reading in less than three seconds.
🥤 Vitamix 5200 Professional-Grade Blender
Whether you are making silky-smooth breakfast smoothies, pureed soups from scratch, or blending absolutely lump-free sauces, this famously indestructible motor pulverizes anything you throw at it. It literally heats soup from the friction of the blades alone.
So you’re craving something sweet, gooey, buttery, and dangerously irresistible… but you’re also trying to avoid spending three hours in the kitchen making a dessert that looks like it came out of a Parisian bakery, right? Same. Good news: this caramel tart recipe is basically the cheat code for dessert lovers. It’s rich, glossy, silky, sweet-but-not-too-sweet, and honestly—it tastes like something you’d brag about on Instagram even though it took way less effort than people think.
And if caramel usually terrifies you (same again), don’t stress. This version is simple, predictable, and beginner-friendly, because nobody here is trying to burn sugar into a brick for the third time this week.
Let’s make magic.
Why This Recipe Is Awesome
Let me count the ways—because honestly, this caramel tart recipe is doing the most with the least.
- It’s idiot-proof. Like, genuinely. If you can stir, you can make this recipe. I’ve made it half-asleep and it still turned out beautiful.
- Minimal ingredients. Sugar, butter, cream, crust. That’s it. We’re not summoning the pastry gods today.
- High reward, low effort. It looks fancy enough to impress guests… but also lazy enough that you can make it in your pajamas.
- It’s rich without being heavy. You know how some caramel desserts make you feel like you need a nap and a prayer? Not this one.
- Customizable AF. Add salt, chocolate, nuts, fruit, whipped cream—whatever you vibe with.
Basically, this tart is the dessert equivalent of the cool friend who gets along with everyone.
Ingredients You’ll Need
Easy list. Zero overthinking. Zero weird ingredients. Just pure dessert bliss.
For the Crust
- 1 ½ cups crushed graham crackers (or digestive biscuits—fancy name, same vibe)
- 6 tbsp melted butter (the real deal, not margarine… please)
- 2 tbsp sugar (optional, but delicious IMO)
For the Caramel Filling
- 1 cup granulated sugar (the star of the show)
- 6 tbsp unsalted butter (cold works best)
- ½ cup heavy cream (don’t substitute this unless you like disappointment)
- ½ tsp salt (optional unless you’re a salted caramel fanatic)
- 1 tsp vanilla extract (because flavor = life)
Optional Toppings (Choose Your Adventure)
- Flaky sea salt
- Whipped cream
- Shaved chocolate
- Crushed nuts
- Sliced strawberries
- Burnt caramel shards (extra bougie)
Step-by-Step Instructions
1. Prepare your crust
Mix your crushed graham crackers with melted butter and optional sugar until the mixture feels like wet sand. Pour it into a tart pan and press it down firmly. Pro tip: Use the bottom of a measuring cup to pack it tightly—your hands are too soft for this job.
Chill the crust in the fridge for 15 minutes to set. Or if you’re impatient (me), bake it at 350°F (175°C) for 8 minutes for a firmer base. Let it cool.
2. Melt the sugar
Grab a heavy saucepan and pour in the sugar. Heat over medium, stirring occasionally until it melts into a clear amber liquid. Don’t panic if it clumps—mine always does before it smooths out. Just keep stirring like you’re avoiding your responsibilities.
3. Add the butter
Once your sugar is melted and gorgeous, add the butter cubes. Expect aggressive bubbling. That’s normal. Stir until the butter fully melts into the caramel.
4. Pour in the cream
Remove the pot from the heat (important!) and slowly add the cream. The mixture will freak out and bubble like it’s having an identity crisis—that’s exactly what we want. Stir until smooth.
5. Add vanilla + salt
Toss these in for flavor. Taste (carefully!) and adjust the salt if you’re going for a salted caramel moment.
6. Fill the crust
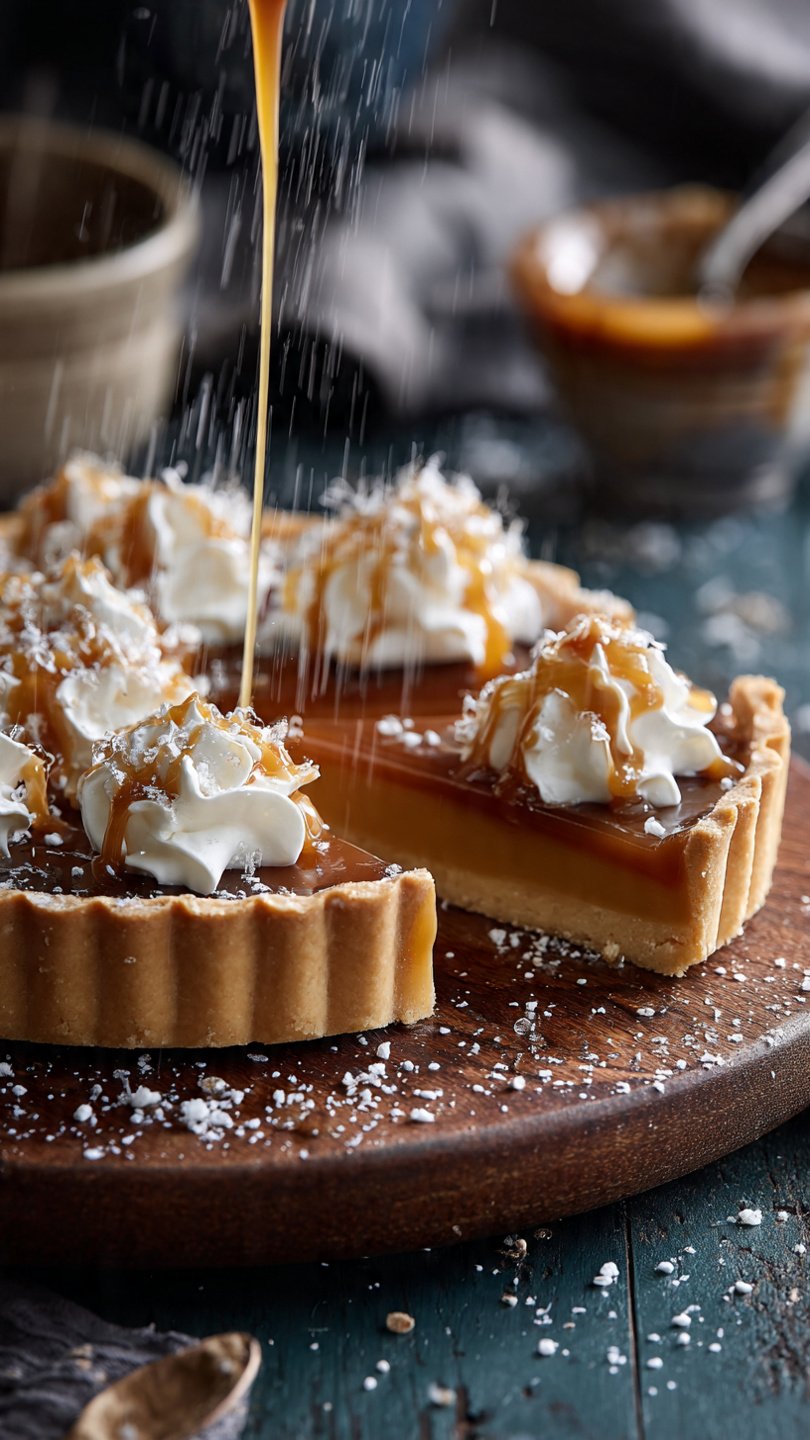
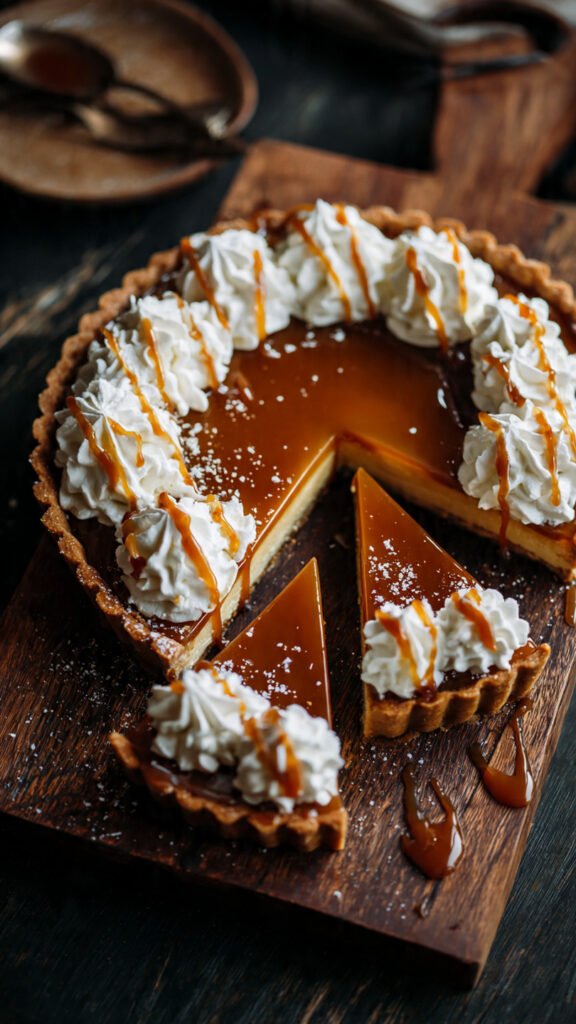
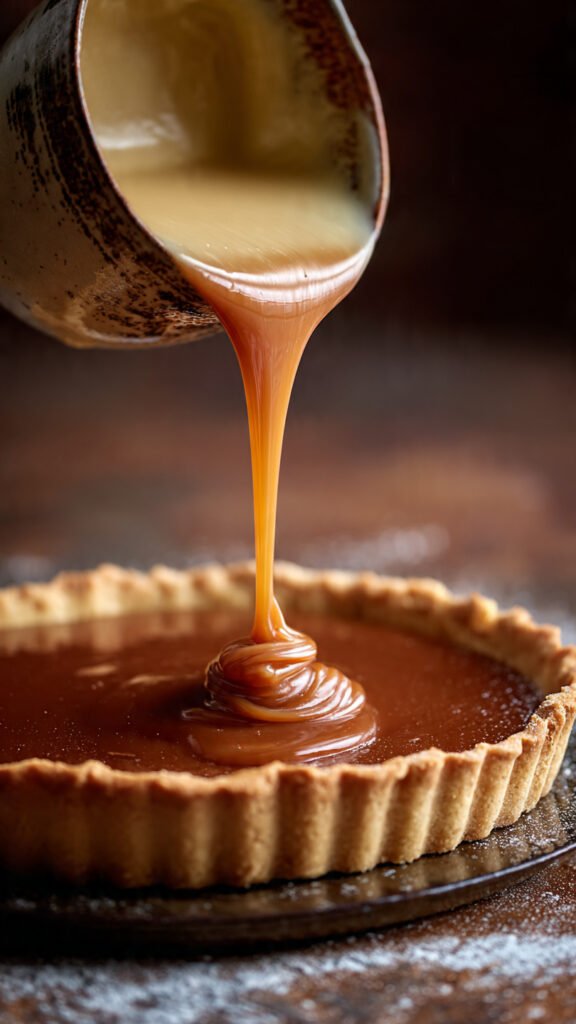
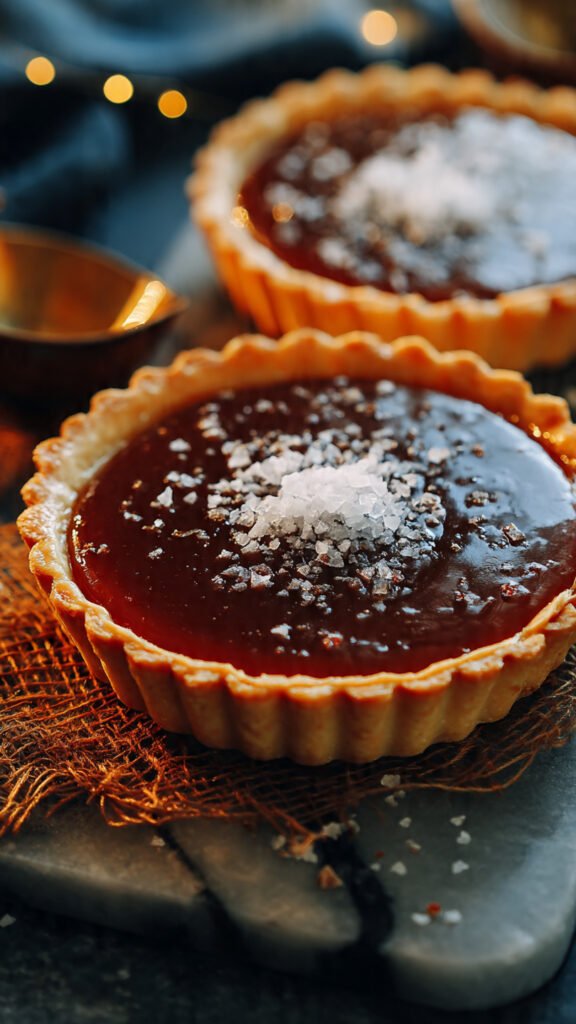
Pour that glossy, silky caramel directly into your tart crust. You’ll feel like you’re doing something illegal. Smooth the top gently.
7. Chill
Pop the tart in the fridge for at least 2–3 hours so it can set. If you cut it too early, it’ll ooze everywhere and you’ll regret your life choices.
8. Decorate (aka show off)
Add your chosen toppings before serving. Sea salt flakes make you look like you know what you’re doing.
Slice. Serve. Pretend you slaved away for hours.
Common Mistakes to Avoid
Learn from the chaos so your tart comes out flawless.
- Thinking you don’t need to preheat the pan. Rookie mistake. If your crust isn’t set right, the whole tart is doomed.
- Walking away while melting sugar. Sugar burns faster than your motivation on a Monday morning.
- Using low-fat cream. Just… why? The caramel won’t set properly.
- Stirring too aggressively. You’re making caramel, not fighting a dragon.
- Cutting into the tart too early. Patience is key unless you like caramel soup.
Alternatives & Substitutions
Feel like mixing things up? I got you.
- Shortbread crust instead of graham cracker: A little fancier, a little more buttery, big yes from me.
- Salted butter instead of unsalted: Totally works—just skip the extra salt later.
- Add chocolate layer: Pour melted chocolate over the crust before adding caramel. Ultra decadent.
- Coconut cream: Works only if you want a coconut flavor. Not a perfect heavy cream dupe, but delicious.
- Nut crust: Crushed pecans or almonds + butter = chef’s kiss.
Experiment or play it safe—there’s no wrong answer here.
FAQ (Frequently Asked Questions)
1. Can I use margarine instead of butter?
Technically yes, but why hurt your soul like that? Butter = flavor. Butter = happiness.
2. Why did my caramel turn gritty?
You probably stirred too much or got sugar on the edges of the pot. Don’t worry, it happens to everyone at least once.
3. How long does caramel tart last?
Up to 3–4 days in the fridge… assuming you don’t eat it all the first night. No judgment.
4. Can I freeze caramel tart?
Yep! Freeze it for up to 1 month. Thaw overnight in the fridge for best texture.
5. How do I make salted caramel tart?
Just add 1 tsp flaky sea salt on top after chilling. Or mix a little extra salt into the caramel. Go wild.
6. Can I use premade caramel?
You can… but trust me, homemade tastes way better. Plus, making caramel makes you feel like a kitchen wizard.
7. My caramel hardened too fast—help?
You probably didn’t add enough cream or the heat was too high. Gently reheat it and whisk until smooth.

Final Thoughts
There you go—your new favorite dessert, ready to be devoured. This caramel tart is silky, buttery, glossy, sweet, and so easy it’s almost criminal. Once you make it, you’ll want to bring it to every potluck, family dinner, or random Tuesday night because honestly? You’re that person now—the one who brings the good dessert.
Now go impress someone (or just impress yourself, because self-love is real).
You earned it.