🌶️ DIY Horse Radish Recipe: Better Than Store-Bought!
👩🍳 The Busy Home Cook's Arsenal
Consistently cooking incredible meals for your family doesn't mean spending three hours in the kitchen every night. These are the 5 absolute life-saving appliances and culinary tools that dramatically cut down prep time while guaranteeing restaurant-quality results.
🌪️ Ninja 4-Quart Air Fryer
The machine that completely changed weeknight dinners. It preheats in seconds and cooks frozen vegetables, chicken wings, and battered fish to an incredibly crispy, deep-fried texture using 75% less oil and taking half the time of a traditional oven.
⏱️ Instant Pot Duo 7-in-1 Pressure Cooker
Forget slow cookers that take 8 hours. This legendary appliance aggressively pressure cooks tough cuts of meat into melt-in-your-mouth tender roasts, stews, and perfectly fluffy rice in under 45 minutes, saving you when you forget to defrost dinner.
🔪 Victorinox Fibrox Pro 8" Chef's Knife
A dull knife is dangerous and makes chopping vegetables a miserable chore. This exact blade reigns supreme in professional kitchens because it holds a terrifyingly sharp edge, features a non-slip grip, and costs significantly less than heavy German steel.
🌡️ ThermoPro Instant Read Thermometer
The secret difference between dry, rubbery chicken and juicy perfection. Stop nervously slicing your proteins open to check if they're done—this waterproof digital pen gives you a highly accurate temperature reading in less than three seconds.
🥤 Vitamix 5200 Professional-Grade Blender
Whether you are making silky-smooth breakfast smoothies, pureed soups from scratch, or blending absolutely lump-free sauces, this famously indestructible motor pulverizes anything you throw at it. It literally heats soup from the friction of the blades alone.
So, you’re standing in the condiment aisle, staring at those sad, gray little jars of horseradish. You know the ones—they look like they’ve been sitting there since the mid-90s, and quite frankly, they taste like wet cardboard mixed with a vague memory of spice. You’re craving that nose-tingling, eye-watering kick that makes a prime rib sing, but you’re too lazy (or maybe just too smart) to settle for the mediocrity of supermarket preservatives.
I feel you.
Here’s the secret big grocery doesn’t want you to know: Making your own horse radish recipe at home is ridiculously easy. It’s cheaper, it’s fresher, and it packs a punch that will make you question your life choices in the best way possible. Plus, you get to feel like a rugged pioneer person, grinding roots in your kitchen—except you have a food processor, so you’re actually just a pioneer with a Wi-Fi connection.
Let’s get into how to make the pungent, spicy, white gold that is prepared horseradish.
Why This Recipe is Awesome
Look, I don’t use the word “awesome” lightly. I save that for things like finding twenty bucks in an old jacket pocket or perfectly ripe avocados. But this recipe? It belongs on the list.
First off, the flavor profile is incomparable. Store-bought stuff is often diluted with cream, oil, or stabilizers to keep it shelf-stable for the next nuclear winter. When you make it fresh, you are getting pure, unadulterated heat. It’s bright, it’s sharp, and it cuts through rich meats like a hot knife through butter.
Secondly, you control the heat. This is where the “food science” magic happens (more on that later). You get to decide if you want a mild tingle or a full-blown, five-alarm fire in your nasal cavity.
Finally, it’s idiot-proof. Seriously. If you know how to operate a peeler and push a button on a blender without injuring yourself, you can make this. It requires zero cooking. That’s right—no heat, no pots, no pans. Just raw vegetable aggression.
Plus, showing up to a dinner party with a jar of homemade horseradish is a massive flex. “Oh, this? I just whipped it up this afternoon.” (Cue impressed gasps).
Ingredients You’ll Need
We are keeping this ingredient list shorter than my patience on a Monday morning. You only need three things. Yes, three.
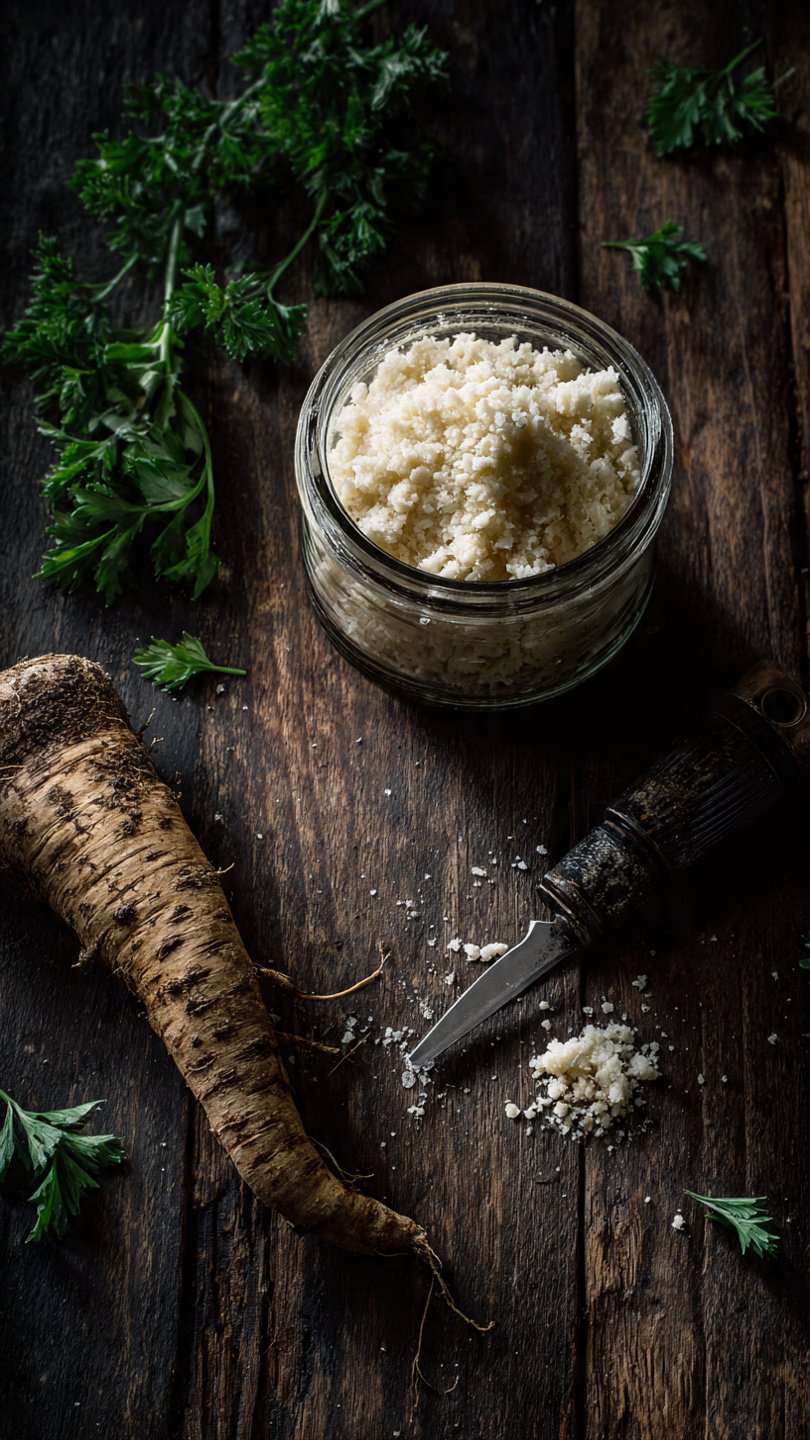
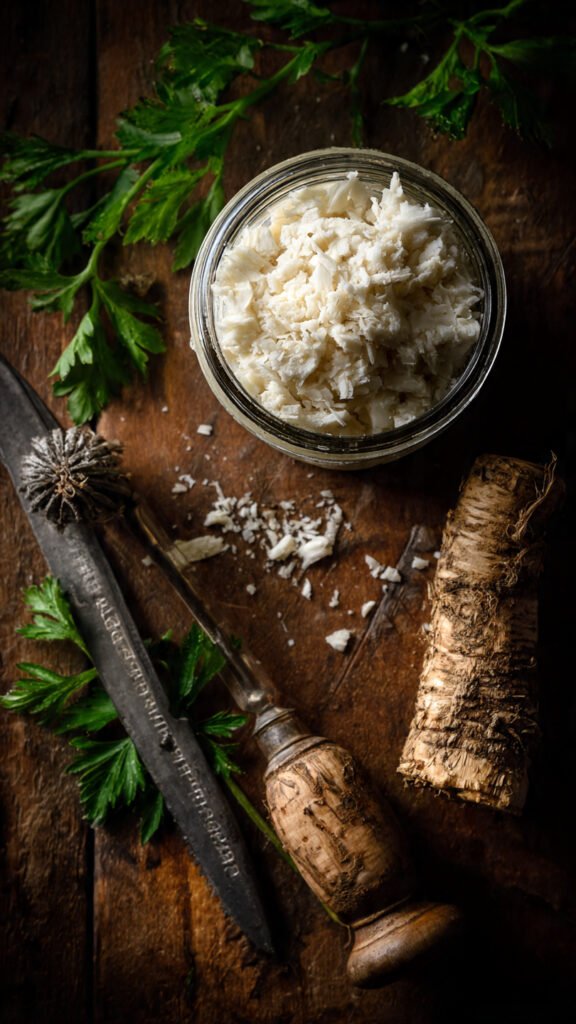
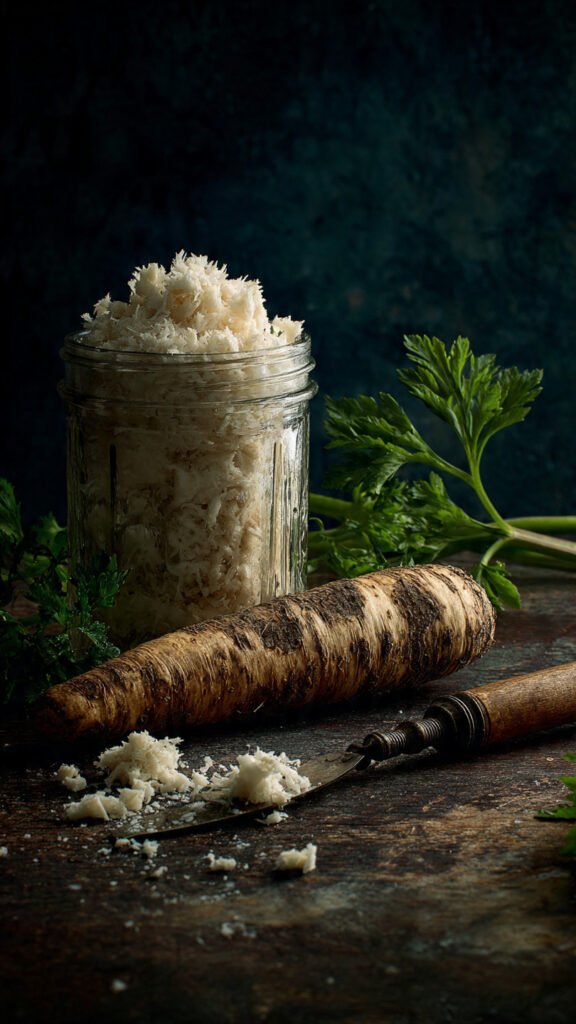
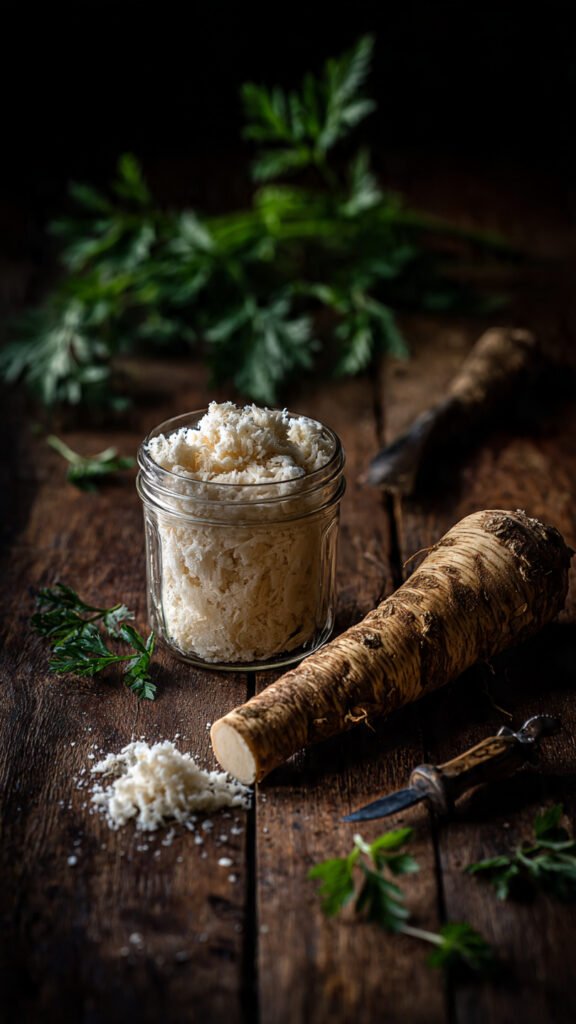
- The Horseradish Root (8-10 inches long): This is the star of the show. When you’re at the store, look for a root that feels rock hard. If it’s squishy or bendy, put it back—it’s old and sad. It should look like a knobby, dirt-covered parsnip that’s seen some things.
- White Vinegar (2-3 Tablespoons): Just regular distilled white vinegar. Nothing fancy here. No balsamic, no apple cider (unless you want it sweet and weird). The vinegar is crucial—it stops the heat reaction and preserves the color.
- Kosher Salt (1/2 Teaspoon): To bring out the flavor. Don’t skip the salt, or it’ll just taste like angry dirt.
- Water (Splash, optional): Only if your blender is struggling to process the root.
Equipment Check:
- A Food Processor or High-Power Blender: Do not try to grate this by hand unless you want to cry for three days straight.
- A Vegetable Peeler: A sharp one. The skin on these roots is tough.
- Glass Jars: For storage.
Step-by-Step Instructions
Ready to make some magic? Put on your safety goggles (I’m only half-joking) and let’s do this.
1. Prep the Beast
Wash your horseradish root thoroughly. Use a vegetable brush to scrub off the dirt. Then, take your peeler and strip away the brown, tough outer skin. You want to get down to the creamy white interior.
- Tip: If there are weird knobby bits you can’t peel, just chop them off. We aren’t winning a beauty contest here.
2. The Chop
Cut the peeled root into small cubes, roughly 1-inch pieces. This just helps your food processor out so the motor doesn’t burn out trying to digest a whole log.
3. The Blitz (The Danger Zone)
Toss the cubes into the food processor. Pulse it until it breaks down into a crumbly texture.
- WARNING: At this stage, do not stick your face directly over the bowl and take a deep breath. The fumes released when you crush the cells of the root are potent. It’s basically nature’s tear gas. Keep your distance, friend.
4. The Science of Heat (Crucial Step!)
Here is where you become the master of your destiny. The heat in horseradish comes from an enzymatic reaction (isothiocyanates for the nerds in the back). This reaction starts the moment you crush the cells.
- For MILD Horseradish: Add the vinegar immediately after crushing. The acid stops the reaction instantly.
- For MEDIUM Horseradish: Wait 2 minutes before adding the vinegar.
- For “I WANT TO SEE THROUGH TIME” Hot: Wait 3 to 4 minutes before adding the vinegar.
5. Final Processing
Once you’ve waited your desired time, add the vinegar and salt. Turn the processor back on and run it until the mixture is fine and creamy (or as smooth as grated root can get). If it looks too dry, add a teaspoon of water at a time.
6. Jar It Up
Scrape the mixture into a glass jar and seal it tight. Pop it in the fridge. It needs a day or so to “mellow” and for the flavors to meld, but you can technically eat it right away if you’re impatient.
Common Mistakes to Avoid
Even though I said this is idiot-proof, people are creative. Here are a few ways you might mess up this horse radish recipe.
- The “Deep Breath” Blunder: I cannot stress this enough. When you open that food processor lid, look away. The vapors are invisible but mighty. If you inhale deeply, you will clear your sinuses, but you might also cry off all your mascara.
- Buying Soft Roots: If the root is soft, the horseradish will be bitter and lack that signature crunch. It needs to be firm. Think baseball bat, not pool noodle.
- Using a Grater: Look, Grandma used to grate horseradish by hand on the porch because she didn’t have electricity and she was tougher than us. You have a Cuisinart. Use it. Grating by hand releases the fumes directly into your eyeballs. It’s torture.
- Hot Water: Never wash the root or process it with hot water. Heat kills the enzymes that create the spice. Keep everything cold to keep it hot. (Paradox? Maybe. Science? Yes.)
- Waiting Too Long: If you wait 10+ minutes to add the vinegar, the horseradish can actually turn bitter and dark. 3-4 minutes is the sweet spot for max heat.
Alternatives & Substitutions
So you’ve made the “prepared horseradish” (the pure stuff). Now, what can you do with it? Or maybe you’re missing an ingredient?
1. Make it “Creamy Horseradish Sauce”: This is the stuff you usually get at steakhouses. To make this, simply take your prepared horseradish and fold it into some sour cream or heavy cream.
- Ratio: 1 part prepared horseradish to 2 parts sour cream. Add a squeeze of lemon and some cracked pepper. Boom.
2. The “Chrain” (Beet Horseradish): Popular in Eastern European and Jewish cuisine. Throw a cooked, peeled beet into the food processor with the horseradish. It turns the mixture a vibrant, shocking pink and adds a lovely earthy sweetness that balances the fire.
3. Wasabi Substitute: Did you know most “wasabi” in cheap sushi joints is just dyed horseradish? If you’re making sushi at home, blend your horseradish into a super fine paste and add a drop of green food coloring (or spinach powder). It’s a remarkably close dupe.
4. Vinegar Swaps: If you don’t have white vinegar, fresh lemon juice is the best alternative. It provides the necessary acid (citric acid vs acetic acid) to stabilize the heat. Apple cider vinegar works too, but it adds a fruity funk that some purists (me, I’m the purist) might find distracting.
FAQ (Frequently Asked Questions)
Q: How long does fresh horseradish last in the fridge? A: It stays potent for about 3 to 4 weeks. After that, it doesn’t go “bad” instantly, but it starts to lose its heat and turns a slightly brownish color. If it looks brown, toss it. We want bright white fire, not sad beige mush.
Q: Can I freeze horseradish? A: You can, but… meh. Freezing can mess with the texture, making it a bit watery when thawed. However, the heat usually stays intact. If you have a bumper crop, grate it and freeze it in small quantities. But fresh is always king (IMO).
Q: Why is my horseradish not hot enough? A: You probably added the vinegar too quickly! Remember the rule: Wait 3 minutes for the enzymes to throw a party before you shut them down with the vinegar police. Also, check your root freshness. Old roots = weak sauce.
Q: Can I grow my own horseradish? A: Absolutely, but be warned: Horseradish is invasive. It’s the “unwanted houseguest” of the garden world. If you plant it in the ground, it will take over your entire yard. Plant it in a deep container or a pot unless you want a horseradish forest forever.
Q: Is horseradish healthy? A: Actually, yes! It’s part of the brassica family (like broccoli and mustard). It’s loaded with antioxidants and has antibacterial properties. So, technically, eating a steak slathered in this sauce is… health food? Let’s go with that.
Final Thoughts
There you have it! You are now fully equipped to make a horse radish recipe that will blow the store-bought competition out of the water.
It’s amazing how something so ugly (seriously, it’s a hideous root) can transform into something so vibrant and essential. Whether you’re slathering it on a roast beef sandwich, stirring it into your Bloody Mary for a Sunday brunch kick, or just eating a tiny spoonful to wake yourself up during a mid-afternoon slump (don’t judge me), you’ve leveled up your kitchen game.
So, grab that gnarly root, brace yourself for the fumes, and enjoy the burn. You’ve earned it!
Now, would you like me to help you find a perfect Prime Rib recipe to pair with your new condiment?