🤤 The Ultimate Halwa Puri Recipe Feast
👩🍳 The Busy Home Cook's Arsenal
Consistently cooking incredible meals for your family doesn't mean spending three hours in the kitchen every night. These are the 5 absolute life-saving appliances and culinary tools that dramatically cut down prep time while guaranteeing restaurant-quality results.
🌪️ Ninja 4-Quart Air Fryer
The machine that completely changed weeknight dinners. It preheats in seconds and cooks frozen vegetables, chicken wings, and battered fish to an incredibly crispy, deep-fried texture using 75% less oil and taking half the time of a traditional oven.
⏱️ Instant Pot Duo 7-in-1 Pressure Cooker
Forget slow cookers that take 8 hours. This legendary appliance aggressively pressure cooks tough cuts of meat into melt-in-your-mouth tender roasts, stews, and perfectly fluffy rice in under 45 minutes, saving you when you forget to defrost dinner.
🔪 Victorinox Fibrox Pro 8" Chef's Knife
A dull knife is dangerous and makes chopping vegetables a miserable chore. This exact blade reigns supreme in professional kitchens because it holds a terrifyingly sharp edge, features a non-slip grip, and costs significantly less than heavy German steel.
🌡️ ThermoPro Instant Read Thermometer
The secret difference between dry, rubbery chicken and juicy perfection. Stop nervously slicing your proteins open to check if they're done—this waterproof digital pen gives you a highly accurate temperature reading in less than three seconds.
🥤 Vitamix 5200 Professional-Grade Blender
Whether you are making silky-smooth breakfast smoothies, pureed soups from scratch, or blending absolutely lump-free sauces, this famously indestructible motor pulverizes anything you throw at it. It literally heats soup from the friction of the blades alone.
Look, I know you. You’re craving something epic for breakfast. You’re tired of the same old sad toast or rubbery scrambled eggs. You want an event. You want flavor that punches you in the face (in a nice way) and textures that make your brain release happy chemicals.
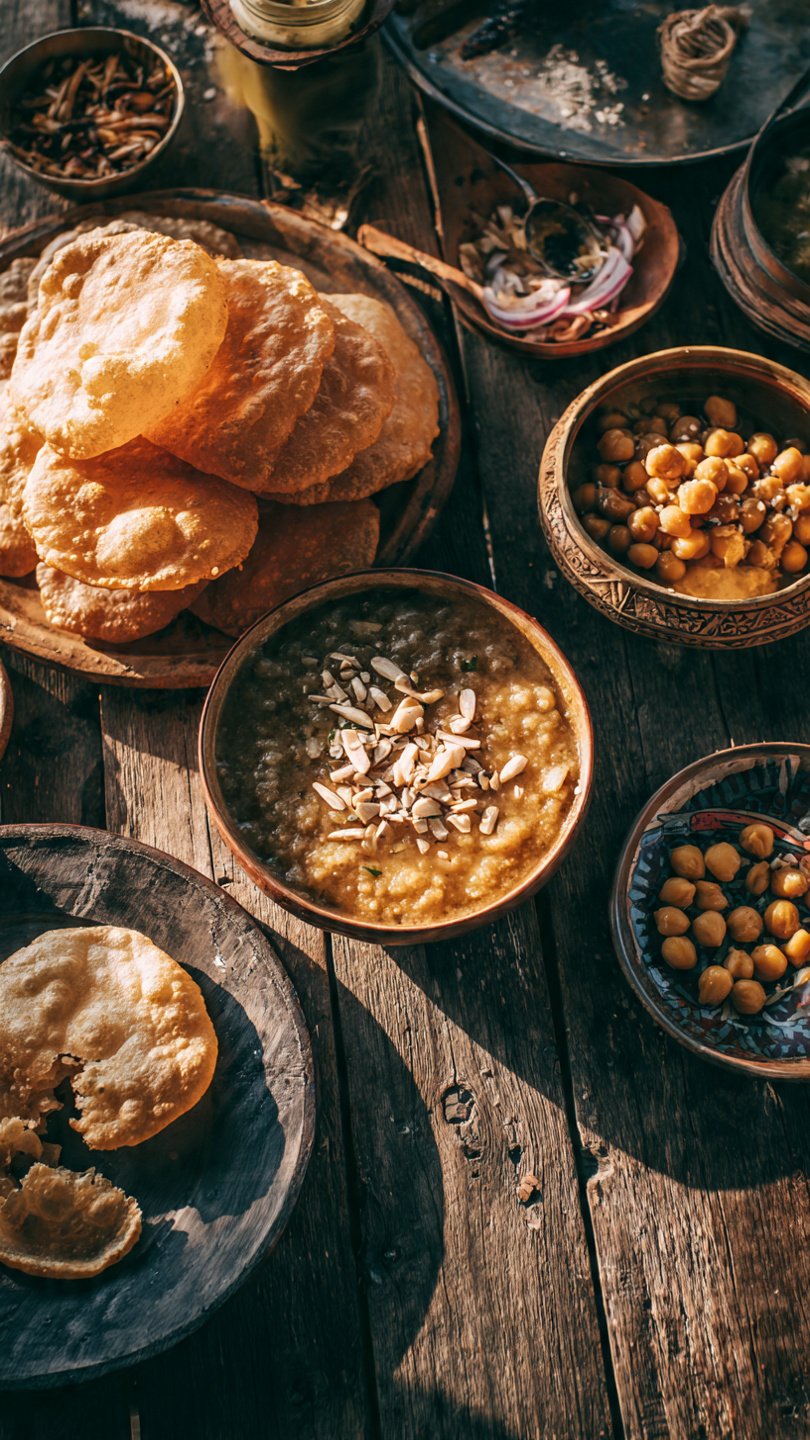
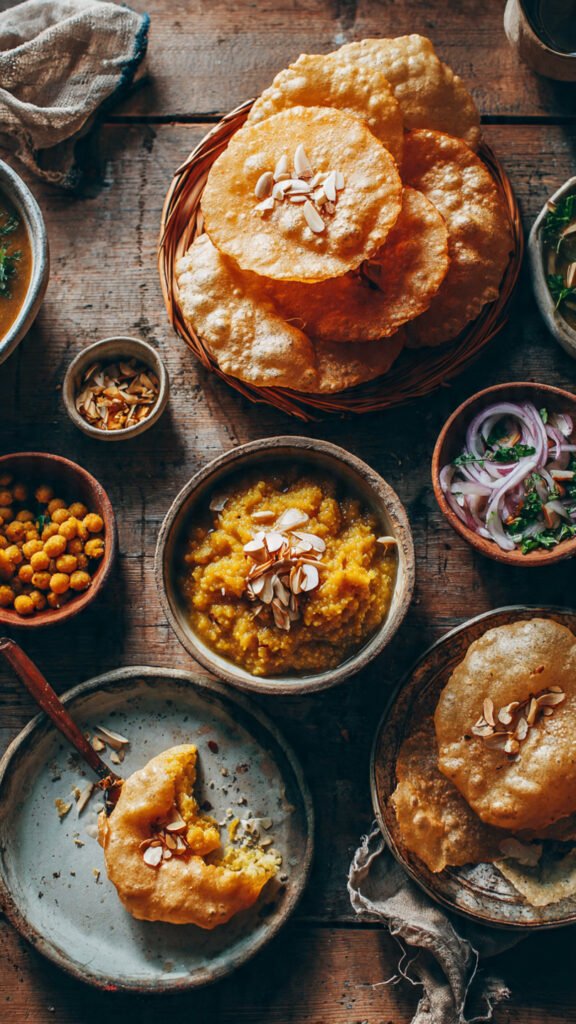
Well, my hungry friend, stop scrolling. You’ve landed on the holy grail of indulgent weekend breakfasts: Halwa Puri.
If you’ve never had it, imagine this: a warm, sweet, buttery semolina pudding (halwa) scooped up with a piece of fresh, deep-fried, crispy-yet-soft bread (puri). It’s a staple breakfast in Pakistan and North India, usually reserved for weekends or celebrations because, let’s be honest, it requires a subsequent nap.
It looks intimidating, I know. Deep frying before noon? Are we crazy? Maybe a little. But stick with me. I’m going to break this down so simply that even if your culinary skills usually peak at “microwave popcorn,” you’re going to crush this.
Why This Recipe is Awesome
Okay, besides the obvious fact that it’s delicious, why should you bother making this from scratch instead of just driving to the nearest Desi neighborhood?
First off, the texture contrast is insane. Store-bought puri often gets limp and sad by the time you get it home. When you make it fresh, you get that incredible, shatteringly crisp exterior that gives way to a soft, chewy interior. It’s like a savory savory donut that thinks it’s flatbread.
Then there’s the Halwa. This isn’t just sweet mush. When done right, the semolina (suji) is toasted in ghee until your entire kitchen smells like nutty, buttery heaven. We infuse it with cardamom so it’s fragrant and aromatic. It’s comforting in a way that a hug rarely achieves.
It’s actually surprisingly therapeutic. There is something deeply satisfying about kneading soft dough, rolling it out, and watching it magically puff up into a golden balloon the second it hits the hot oil. It makes you feel like a kitchen wizard.
This recipe is designed to be idiot-proof. I’ve stripped back the complicated steps and focused on the techniques that actually matter—like getting your oil temperature right and not burning the suji. Plus, we’re using real ingredients. No weird preservatives here. Just pure carbs and fats, the way nature intended.
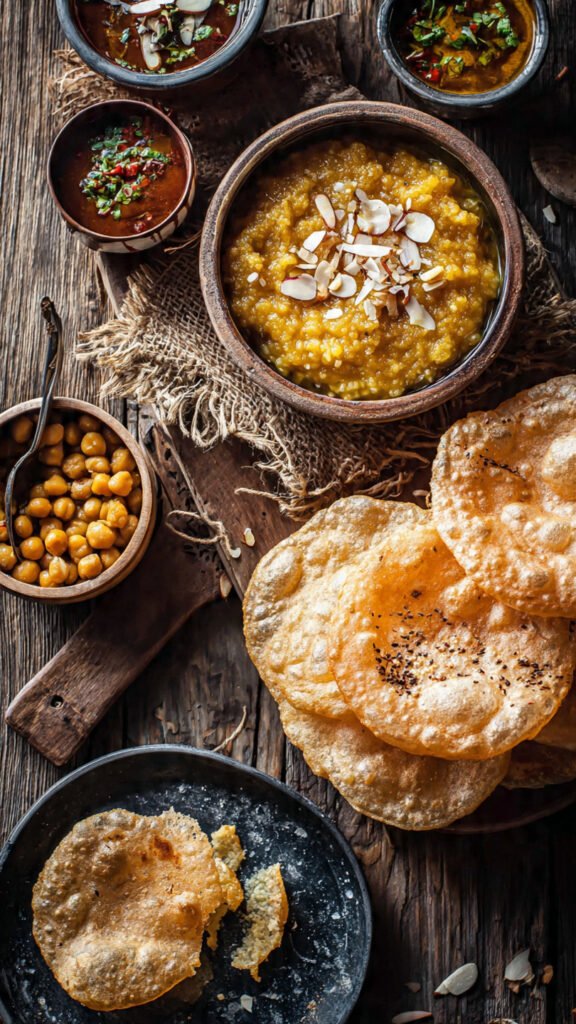
FYI: Traditionally, Halwa Puri is served with a spicy chickpea curry (chana masala) to balance the sweet. To keep this article focused, we are tackling the main event—the Halwa and the Puri. Just know that if you serve this without something savory on the side, the Desi community might gently judge you.
Ingredients You’ll Need
We aren’t dealing with saffron harvested by moonlight here. These are pantry staples, folks.
For the Puri (The Bread):
- All-Purpose Flour (Maida): The backbone of our crispy balloon. You can cut it with some whole wheat flour if you want to pretend to be healthy, but all-purpose gives the best texture.
- Semolina (Suji/Rava): Just a tablespoon or two creates a lovely crunch.
- Salt & Sugar: Just a pinch of each for balance.
- Oil (plus lots for frying): A little fat in the dough makes it pliable.
- Water: To bind it all together.
For the Halwa (The Sweet Stuff):
- Semolina (Suji): The star of the show. Get the fine variety if you can; the coarse stuff turns out a bit gritty.
- Ghee (Clarified Butter): Do not—I repeat, DO NOT—try to sub this with regular oil unless you are vegan. Ghee is the flavor. Ghee is life. It gives the halwa its nutty, rich backbone.
- Sugar: Obviously.
- Water (or milk): Water makes a lighter halwa; milk makes it richer. I usually go 50/50.
- Green Cardamom Pods: Crushed slightly. This is the perfume of the dish.
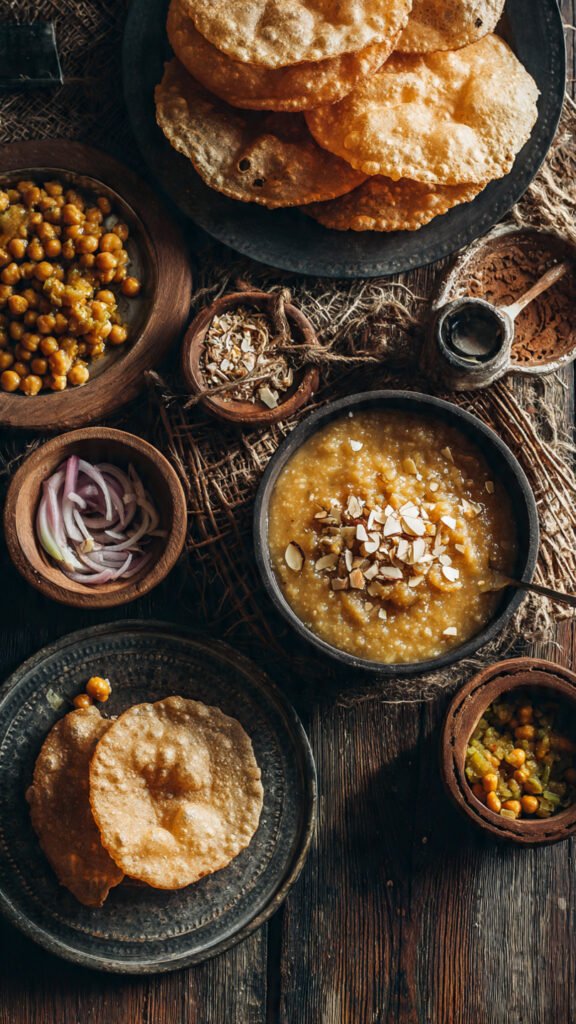
- Optional Bling: Sliced almonds, pistachios, or golden raisins to make it look fancy.
Step-by-Step Instructions
We are going to operate in phases here. Don’t panic. Read through once before you start.
Phase 1: The Puri Dough (Do this first!)
- Mix the Dry: Grab a large mixing bowl. Toss in 2 cups of flour, 2 tablespoons of semolina, a teaspoon of salt, and a teaspoon of sugar. Give it a whisk.
- Add the Fat & Water: Drizzle in 2 tablespoons of oil. Mix it with your fingers until the flour feels a bit sandy. Now, slowly—slowly—add water while mixing with your hand. You need about ¾ cup to 1 cup, but humidity changes things.
- The Knead: You want a medium-firm dough. Not too sticky, not rock hard. Once it comes together, dump it onto the counter and knead it for about 5–7 minutes. Put some muscle into it! You want it smooth and pliable, kind of like the texture of a soft earlobe. (Weird comparison, but accurate).
- The Crucial Rest: This is the step impatient people skip. Do not skip this. Grease the dough ball lightly with oil, cover it with a damp cloth, and let it rest for at least 30 minutes. The gluten needs to relax, otherwise, your puris will snap back when you roll them and won’t puff up.
Phase 2: The Halwa (While the dough rests)
- Make the Syrup: In a saucepan, combine 2 cups of water (or milk/water mix), 1 cup of sugar, and 3-4 crushed cardamom pods. Bring it to a boil just until the sugar dissolves. Turn off the heat and set aside.
- Toast the Suji: Heat a separate, heavy-bottomed pan over medium heat. Add ½ cup of ghee. Once melted, add 1 cup of semolina (suji).
- The Aromatic Shift: Stir constantly. Seriously, don’t check your phone. You need to roast the semolina until it turns a lovely golden-brown color and smells incredibly nutty. If it smells like burnt popcorn, you’ve gone too far. This usually takes 8–10 minutes.
- The Dangerous Part: Turn the heat to low. Very carefully (it will sputter fiercely like an angry dragon), pour the sugar syrup into the roasted semolina while stirring constantly to prevent lumps.
- Thicken Up: Keep stirring. The mixture will quickly absorb the liquid and start pulling away from the sides of the pan. Once it looks like thick pudding and you see tiny bits of ghee separating at the edges, kill the heat. Toss in your nuts/raisins if using. Cover it to keep it warm.
Phase 3: Frying the Puris (Showtime!)
- Heat the Oil: Get a wok or a deep Dutch oven. Fill it with enough oil to deep fry (at least 3 inches deep). Heat it on medium-high. You want the oil hot—around 375°F (190°C).
- Prep the Dough: Uncover your rested dough. Give it a quick knead. Pinch off small pieces, about the size of a golf ball, and roll them into smooth rounds between your palms. Keep them covered so they don’t dry out.
- Roll ‘Em Out: Grease your rolling pin and counter lightly with oil (don’t use flour for dusting, it burns in the oil and looks messy). Take a dough ball and roll it out into a circle about 5–6 inches in diameter. Not too thin (like a tortilla) or it will be hard, not too thick or it won’t cook inside.
- The Fry: Test the oil first. Drop a tiny piece of dough in. If it sizzles immediately and floats to the top, you’re golden. Carefully slide a rolled puri into the hot oil.
- The Magic Puff: This is the best part. As soon as it hits the oil, wait 5 seconds, then gently press down on the puri with a slotted spoon. This encourages steam to build up inside, forcing it to puff into a balloon.
- Flip & Drain: Once puffed and golden on the bottom (it takes literally seconds), flip it over. Cook for another 10–15 seconds until the other side is golden. Remove with a slotted spoon and drain on paper towels. Repeat until you run out of dough or willpower.
Serve immediately while the puris are hot and the halwa is warm.
Common Mistakes to Avoid
I’ve made these mistakes so you don’t have to. You’re welcome.
- Cold Oil: If your oil isn’t hot enough, the puri will just sit there sadly soaking up grease instead of puffing. It will be heavy, oily, and disappointing.
- Overcrowding the Pan: Only fry one puri at a time. Maybe two if you’re a pro with a huge wok. Adding too many drops the oil temperature too fast.
- Burning the Halwa: Seriously, semolina goes from “raw” to “burnt” in about 30 seconds if you stop stirring during the roasting phase. Don’t walk away.
- Skipping the Dough Rest: If you try to roll the dough immediately after kneading, it will be rubbery and shrink back. The gluten needs a nap. Let it rest.
- Using Flour to Roll: As mentioned, dusting your counter with flour instead of oil seems easier, but that excess flour falls off into your hot oil, burns, and sticks to the next batch of puris, making them look dirty.
Alternatives & Substitutions
- Vegan-ize it: The puri is already vegan. For the halwa, swap the ghee for refined coconut oil or a good quality vegan butter block. Use water or plant milk instead of dairy milk. It won’t have that distinct ghee flavor, but it’ll still be good.
- Whole Wheat Puris: If you want these slightly heartier (and traditionally, they are often made this way), use 50% whole wheat flour (atta) and 50% all-purpose flour. They might not puff quite as dramatically, but they have a lovely rustic flavor.
- Halwa Sweetness: The 1:1 ratio of sugar to suji is standard, but if you don’t have a massive sweet tooth, you can reduce the sugar to ¾ cup.
- Flavor Twists: Sometimes I add a tiny pinch of saffron strands to the warm milk/water syrup for the halwa. It adds a gorgeous yellow color and a luxurious floral aroma.
FAQ (Frequently Asked Questions)
Q: Can I make the dough the night before? A: Absolutely. In fact, it’s a great idea. Make the dough, wrap it tightly in plastic wrap, and toss it in the fridge. Let it come to room temperature for about 30 minutes before rolling it out the next morning.
Q: Why didn’t my puri puff up? A: Two likely culprits: either your oil wasn’t hot enough, or you rolled the puri too thin, and the steam escaped before it could lift the dough. Try again; it takes practice!
Q: Is this healthy? A: Hahaha. Next question. (Look, it’s deep-fried bread and butter-sugar pudding. It’s good for the soul, not the arteries. Eat it occasionally and enjoy it without guilt).
Q: My halwa got too hard when it cooled down. A: You probably cooked it a bit too long, or didn’t add enough liquid. Halwa thickens significantly as it cools. Next time, take it off the heat while it’s still a bit looser than you think it should be. You can try stirring in a splash of hot milk to loosen it back up.
Q: Can I bake the puris instead of frying? A: IMO, no. You can bake them, but they won’t be puris. They’ll be hard little crackers. The magic happens in the hot oil.
Final Thoughts
There you have it. You have successfully navigated the glorious, carb-loaded waters of a traditional Desi breakfast.
This recipe is best enjoyed messy. Tear off a piece of that hot, puffy bread, use it as a scoop for the warm, fragrant halwa, and shovel it in. Ideally, you are wearing pajamas while doing this.
Don’t worry if your first few puris look more like deformed amoebas than perfect circles. They will still taste amazing. Cooking this kind of food is about the process, the smells, and the joy of feeding people you like (or just feeding yourself really well).
Now go impress someone with your new culinary skills. You’ve earned a nap.