🍞 The Ultimate Squidgy Malt Loaf Recipe (Better Than Store-Bought!)
👩🍳 The Busy Home Cook's Arsenal
Consistently cooking incredible meals for your family doesn't mean spending three hours in the kitchen every night. These are the 5 absolute life-saving appliances and culinary tools that dramatically cut down prep time while guaranteeing restaurant-quality results.
🌪️ Ninja 4-Quart Air Fryer
The machine that completely changed weeknight dinners. It preheats in seconds and cooks frozen vegetables, chicken wings, and battered fish to an incredibly crispy, deep-fried texture using 75% less oil and taking half the time of a traditional oven.
⏱️ Instant Pot Duo 7-in-1 Pressure Cooker
Forget slow cookers that take 8 hours. This legendary appliance aggressively pressure cooks tough cuts of meat into melt-in-your-mouth tender roasts, stews, and perfectly fluffy rice in under 45 minutes, saving you when you forget to defrost dinner.
🔪 Victorinox Fibrox Pro 8" Chef's Knife
A dull knife is dangerous and makes chopping vegetables a miserable chore. This exact blade reigns supreme in professional kitchens because it holds a terrifyingly sharp edge, features a non-slip grip, and costs significantly less than heavy German steel.
🌡️ ThermoPro Instant Read Thermometer
The secret difference between dry, rubbery chicken and juicy perfection. Stop nervously slicing your proteins open to check if they're done—this waterproof digital pen gives you a highly accurate temperature reading in less than three seconds.
🥤 Vitamix 5200 Professional-Grade Blender
Whether you are making silky-smooth breakfast smoothies, pureed soups from scratch, or blending absolutely lump-free sauces, this famously indestructible motor pulverizes anything you throw at it. It literally heats soup from the friction of the blades alone.
Okay, stop what you’re doing right now. Seriously, put down the phone (unless you’re reading this on it, in which case, carry on) and listen up. Are you currently craving something ridiculously sticky, deeply comforting, and slightly chewy to have with your afternoon cuppa?
Yeah, me too. Always.
Today, we aren’t messing around with delicate pastries or complicated sourdough starters that require more attention than a needy toddler. We are making the undisputed king of teatime treats: the mighty malt loaf recipe.
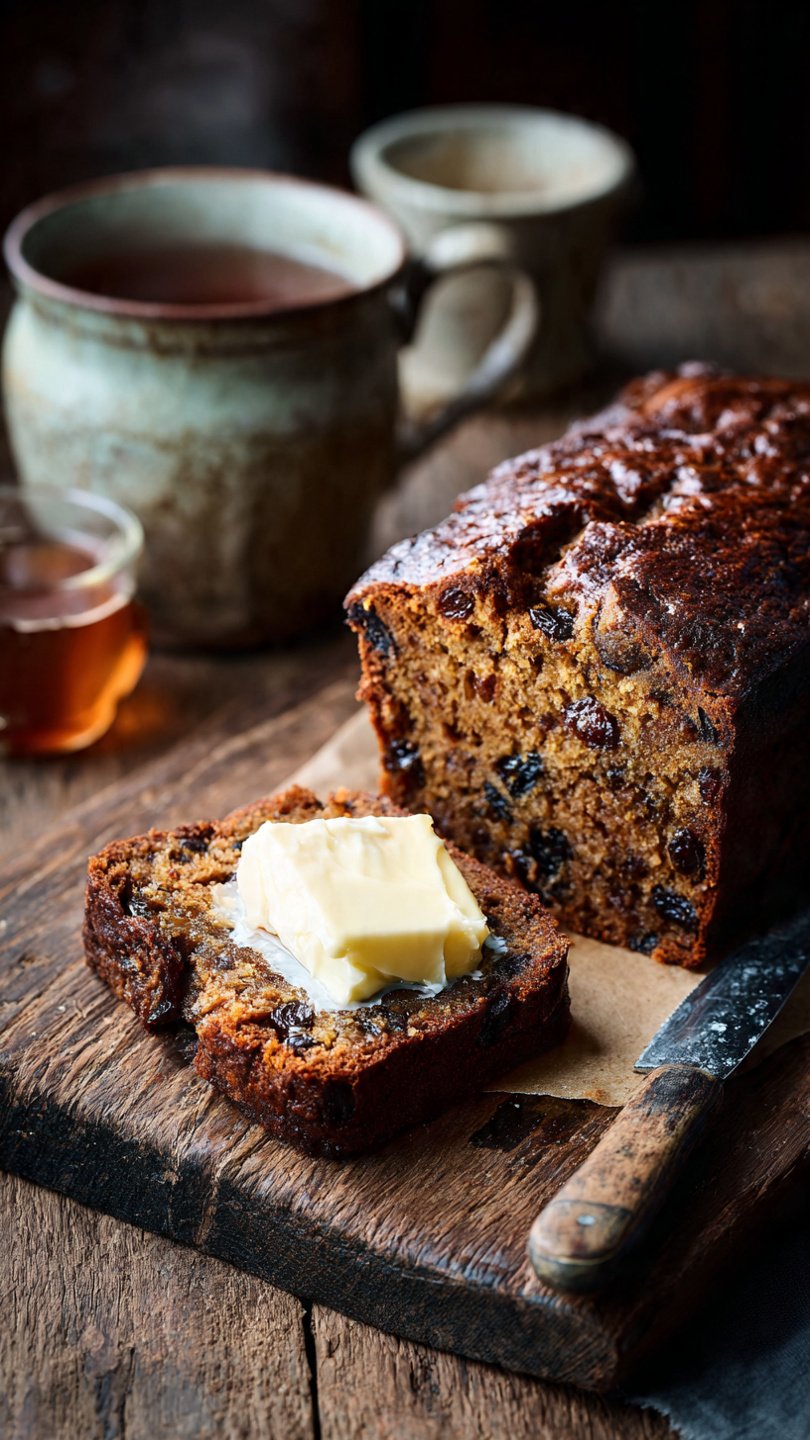
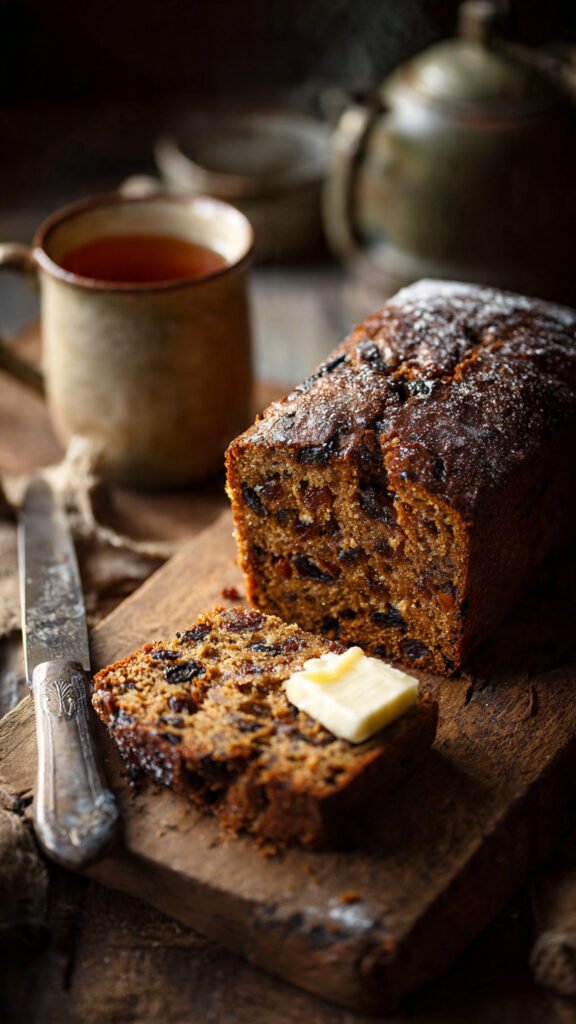
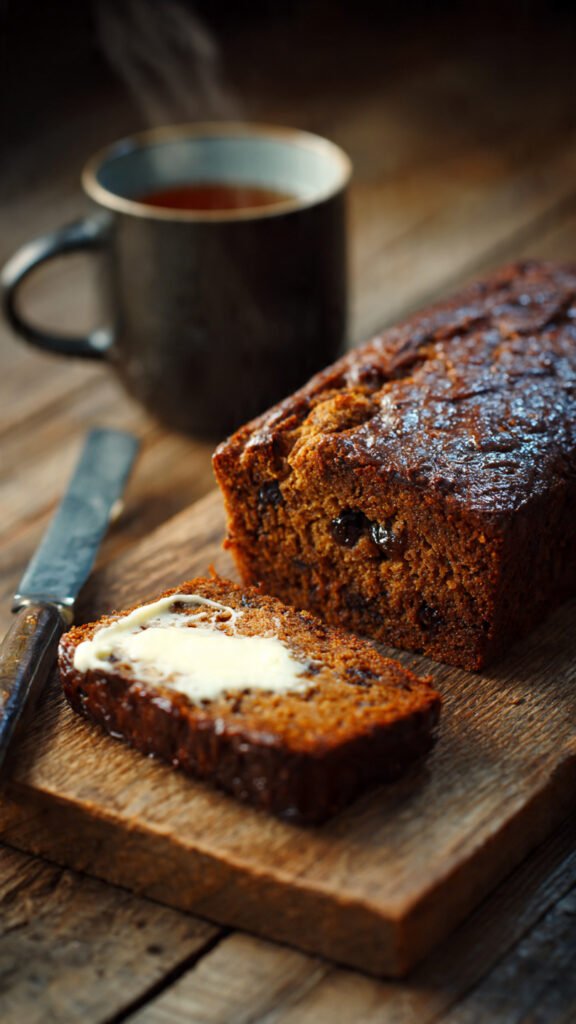
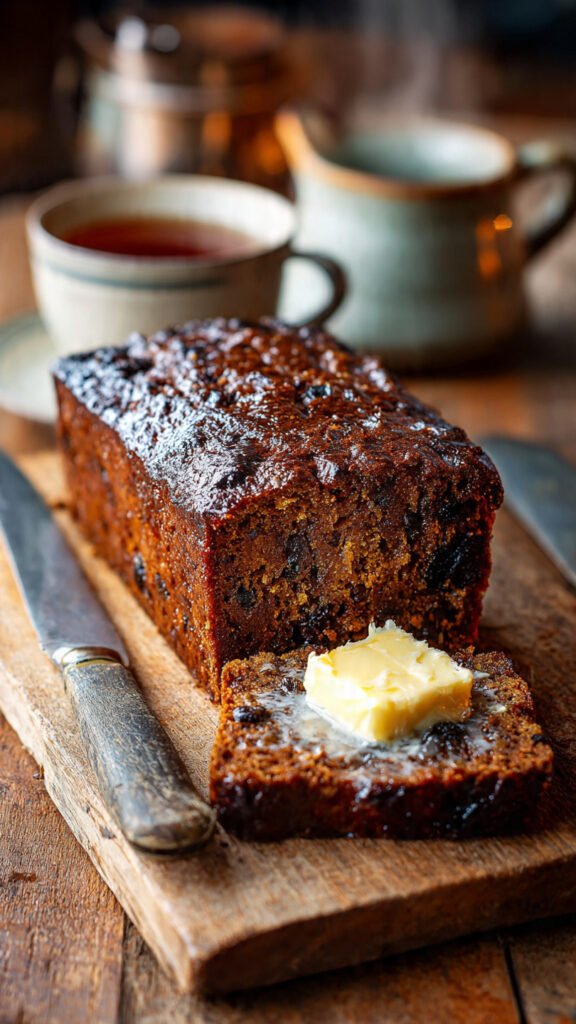
If your only experience with malt loaf is those sad, slightly dry bricks from the supermarket aisle that need a chainsaw to slice, prepare to have your mind blown. Homemade malt loaf is an entirely different beast. It’s squidgy (the technical term, obviously), incredibly aromatic, and frankly, addictive. Let’s get sticky.
Why This Recipe is Awesome
Look, I don’t use the word “life-changing” lightly. Usually, I reserve it for finding jeans that actually fit or discovering a new series to binge-watch in one sitting. But this malt loaf recipe? It’s bordering on life-changing territory.
Here is precisely why you need to drop everything and make this happen in your kitchen today:
1. The “Squidge Factor” is Off the Charts The main problem with commercial malt loaf is that it often leans towards “dry cake” territory. A real malt loaf should offer some resistance when you bite into it. It should be dense, heavy, and gloriously sticky. Achieving this texture is practically a science, involving the precise interaction between the sugars in the malt extract, the moisture from the tea-soaked fruit, and a low-and-slow baking process. This recipe nails that elusive, chewy texture that makes you want to peel bits off with your fingers.
2. It’s Virtually Idiot-Proof I love baking, but I hate complicated techniques. If a recipe asks me to separate six eggs and fold them in “gently like a sleeping cloud,” I’m out. This recipe is essentially a “melt and mix” situation. You don’t need a stand mixer. You don’t need bulging biceps for kneading. You barely even need patience, except for the baking time. If you can stir things in a bowl without throwing them on the ceiling, you can make this loaf.
3. The Smell Will Make Your Neighbors Jealous There is something deeply primal about the smell of malt roasting in the oven. As this loaf bakes, your kitchen is going to smell like a combination of caramelized sugar, warm toast, earthy molasses, and pure happiness. It’s the kind of scent that makes people walk into the room and immediately ask, “What are you making, and can I have some right now?”
4. The “Magic Maturing” Trick This is the weirdest, coolest thing about malt loaf. It tastes good fresh out of the oven. But if you wrap it up tight and hide it in a cupboard for two or three days? It transforms. The flavors meld, the moisture redistributes, and it becomes infinitely stickier and maltier. It’s delayed gratification at its finest. It’s basically a science experiment you can eat.
Ingredients You’ll Need
We aren’t dealing with obscure ingredients you have to order from a specialty store in another country. This is humble, honest pantry stuff.
- Malt Extract: The undisputed star of the show. Do not substitute this. You can usually find it in the baking aisle or sometimes near the jams and honeys. It’s thick, dark, and sticky as heck. FYI: It looks a lot like molasses, but the flavor is distinctly “malty” (think the inside of a Malteser).
- Black Tea (Strong & Hot): We are using this to soak the dried fruit. The tannins in the tea add a lovely depth of flavor that balances the sweetness, and the hot liquid plumps up the fruit so your loaf isn’t dry. Use a good quality breakfast tea bags—none of that weak, dusty stuff.
- Dried Fruit Mix (Sultanas/Raisins): You need a lot of fruit here. It provides moisture and little pockets of chewy sweetness. I prefer a mix of sultanas and raisins, but you do you. Just ensure they are fresh; if they’ve been in your cupboard since 2019 and resemble small pebbles, buy new ones.
- Dark Brown Soft Sugar: We want that deep molasses flavor that dark sugar provides. White sugar is too boring for this loaf; it just won’t give you the right color or caramel notes.
- Plain Flour (All-Purpose Flour): No fancy bread flour needed here. We aren’t trying to develop massive gluten structures; we want a tender, dense crumb.
- Baking Powder & Baking Soda (Bicarbonate of Soda): The dynamic duo of lift. Because this batter is heavy, we need both to ensure it doesn’t end up as a dense brick. The baking soda also reacts with the acidity in the malt and tea to help darken the loaf.
- Egg: Just one large egg to bind everything together and add a little richness.
- Salt: A pinch to balance the sweetness. Never skip the salt in sweet bakes!
Step-by-Step Instructions
Ready to get sticky? Roll up your sleeves. We’re going in.
1. The Great Fruit Soak First things first. Brew about 150ml (around 2/3 cup) of incredibly strong black tea—use two teabags if you have to. Put your dried fruit (about 200g) into a bowl and pour that hot tea right over them. Stir in your dark brown sugar (about 80g) now, too, so it dissolves in the warmth. Cover this bowl with a plate and walk away for at least 30 minutes. Why do this? We are rehydrating the fruit so it doesn’t suck moisture out of your cake batter later. Plus, the fruit absorbs that lovely tea flavor.
2. The Sticky Situation While the fruit is having its spa day, grease a standard 2lb loaf tin really well and line it with baking parchment. Now, grab a small saucepan. Weigh out your malt extract (around 150g). This will be messy. It will stick to the spoon, the bowl, and your fingers. Accept your fate. Gently warm the malt extract in the pan just until it becomes runny and pourable—don’t let it boil!
3. Dry Assembly In a large mixing bowl, sift together your plain flour (250g), baking powder (1 tsp), baking soda (1/2 tsp), and salt pinch. Whisk them dry. Why whisk dry ingredients? Because biting into a clump of pure baking soda is a really bad time. It tastes soapy and metallic. Let’s avoid that.
4. The Big Mix Preheat your oven to 150°C (300°F) fan setting. Yes, that’s low. We are baking low and slow here. Your fruit should now be plump and the liquid cooled slightly. Crack your egg into the fruit/tea mixture and beat it in well. Now, pour this wet, fruity sludge into your dry flour mixture. Add the warmed, runny malt extract.
5. Stir, Don’t Stress Grab a wooden spoon or spatula and fold everything together. Crucial tip: Do not overmix this. You just want to combine it until you can’t see big streaks of dry flour. The batter will look thick, dark, and lumpy, like very questionable porridge. That’s perfect. If you beat it like crazy, you’ll develop gluten and end up with a tough loaf instead of a tender one.
6. The Long Bake Scrape that glorious batter into your lined loaf tin and smooth the top. Pop it into the center of your preheated oven. Bake for about 50 minutes to 1 hour. How to tell if it’s done: This is tricky because the loaf is naturally sticky. A skewer inserted into the middle won’t come out bone dry. It should come out clean of raw batter, but it might have some sticky crumbs attached. The top should feel firm and springy when gently pressed. If it feels liquidy underneath, give it another 5-10 minutes.
7. The Glaze of Glory (Optional but Recommended) As soon as you pull that hot loaf out of the oven, quickly brush the top with a little extra malt extract while it’s still piping hot. This gives it that stunning, shiny, sticky lacquered finish that looks so professional. Let it cool in the tin for about 15 minutes before transferring it to a wire rack to cool completely.
Common Mistakes to Avoid
Look, I said it was idiot-proof, but there are still ways to mess this up if you really try. Don’t do these things:
- Skimping on the Soak Time: If you rush the fruit soaking step, your fruit will be hard bullets inside the loaf, and the loaf itself will be dry because the fruit stole all the moisture during baking. Patience, grasshopper.
- Oven Too Hot: This is the biggest killer of malt loaves. If your oven is too hot (like standard cake temperature of 180°C/350°F), the outside will burn to a crisp before the dense middle is even close to cooked. Low and slow is the mantra.
- Eating It Too Soon: I know, I know. It smells amazing. You want it now. But if you slice it warm, it might seem a bit gummy or doughy. It needs to cool to set its structure properly. And ideally, it needs a few days to mature.
Alternatives & Substitutions
Want to shake things up? Here’s how to freestyle without ruining everything.
- The Fruit Swap: Not a fan of sultanas? Fine. Chopped dates work incredibly well and add an extra caramel flavor. Dried figs are also fancy and delicious. Just ensure whatever you use is chopped to roughly raisin size so it distributes evenly.
- The Tea Twist: Earl Grey tea adds a lovely floral, citrusy note that pairs surprisingly well with the malt. Lapsang Souchong adds a smoky depth if you’re feeling brave and savory-sweet.
- The Crunch Factor: Want some texture? Fold in half a cup of chopped walnuts or pecans at the very end of mixing. The nutty crunch against the soft chew is A+.
- No Malt Extract? Sigh. Okay, if you absolutely cannot find it, you can use black treacle or molasses. BUT, be warned: it will not taste like a traditional malt loaf. It will taste like a treacle loaf. Still good, but different. It will likely be darker and have a slightly more bitter, robust flavor profile.
FAQ (Frequently Asked Questions)
Q: My malt loaf sank in the middle. Did I anger the baking gods? A: Probably not. You likely either opened the oven door too early to peek (don’t do that!), or it wasn’t quite baked through in the center when you took it out. The dense batter needs that full hour to set its structure.
Q: Can I use self-raising flour instead of plain flour and raising agents? A: Technically, yes. If you do, omit the baking powder, but keep the baking soda (bicarbonate of soda). You need that extra kick of soda to deal with the heavy malt and acidity.
Q: Do I really have to wait 2 days to eat it? A: Look, I’m not the baking police. You can eat it as soon as it’s cool. It will be delicious. But trust me on this—if you wrap it tightly in foil and put it in an airtight container for 48 hours, it transforms into something magical. The moisture evens out, the stickiness increases, and the flavor deepens. Your call.
Q: What is the correct ratio of butter to malt loaf slice? A: The limit does not exist. The butter should be thick enough that you can see teeth marks in it when you bite down. If you aren’t slightly concerned for your arteries, you haven’t used enough butter. Salted butter is non-negotiable here, IMO.
Q: How long does it last? A: Because of the high sugar content and dense texture, it keeps really well. Wrapped tightly, it will last easily for a week at room temperature, getting better for the first few days.
Final Thoughts
There you have it. You are now armed with the knowledge to create the sticky, chewy, malty masterpiece that is a proper British malt loaf. It’s comforting, it’s nostalgic, and it’s the absolute perfect excuse to sit down for twenty minutes with a hot drink and ignore your responsibilities.
Don’t be afraid of the stickiness. Embrace the mess. And seriously, don’t skimp on the butter. Now go impress someone—or just impress yourself—with your new culinary skills. You’ve earned it!