🍓 Fruit Sando Recipe: The Fluffiest Japanese Sandwich
Okay, stop doom-scrolling through Instagram for a second. You’ve seen them. Those impossibly fluffy, perfectly square Japanese sandwiches with the stunning cross-sections of strawberries and kiwi looking like stained glass windows in a cathedral of dairy. You want one. I want one.
But maybe you’re thinking, “It’s just a sandwich, how hard can it be?” followed immediately by, “Wait, why does mine look like a crime scene involving squashed berries and sad bread?”
Welcome to the safe space of the Fruit Sando. It’s basically shortcake that you can eat with your hands, which automatically makes it the superior dessert. Whether you’re trying to impress a date, hosting a brunch that you want to pretend is effortless, or just sitting on your kitchen floor at 2 AM craving sugar (no judgment), this recipe is your new best friend. Let’s make some edible art that actually tastes better than it looks.
Why This Recipe is Awesome
Look, I’m not going to lie to you—making a sandwich shouldn’t require an engineering degree. But the Fruit Sando (short for fruit sandwich, obviously) is deceptive. It looks simple, but it requires a little bit of finesse. This specific recipe is awesome because it tackles the biggest enemy of the fruit sando: structural integrity.
Most recipes just tell you to whip some cream and slap it on bread. Wrong. That’s a recipe for a slide-y, soggy mess that falls apart the second you look at it. We aren’t doing that here.
Here is why you will love this version:
- The Stability Factor: We are using a secret weapon in the whipped cream (spoiler: it’s mascarpone) that makes the cream stable enough to hold up heavy fruit, but soft enough to feel like a cloud. It tastes like a cheesecake and a cloud had a baby.
- The Texture Trinity: You get the pillowy bounce of the milk bread, the rich velvet of the cream, and the juicy snap of fresh fruit. It’s a sensory playground.
- No Oven Heat: It’s currently [insert current season], and honestly, turning on the oven is a commitment I’m not always ready to make. This is high-reward, zero-heat cooking.
- The “Reveal” Dopamine Hit: There is nothing, and I mean nothing, more satisfying than slicing through that sandwich and seeing the perfect geometric cross-section. It makes you feel like a master chef, even if you burned toast ten minutes ago.
- Customizable Vibes: Hate strawberries? Fine (weirdo). Use mango. Love grapes? Go for it. This recipe is a template for whatever fruit is currently looking sexy in the produce aisle.
Ingredients You’ll Need
We are keeping this list short, but quality matters here. Since there are only a handful of ingredients, there’s nowhere for the bad stuff to hide.
- Shokupan (Japanese Milk Bread): This is non-negotiable. Okay, it’s sort of negotiable, but if you want the authentic experience, you need Shokupan. It’s fluffy, slightly sweet, and has a tight crumb. Sub: Thick-sliced white brioche or a high-quality white sandwich bread (Texas Toast style).
- Heavy Whipping Cream: You need the full-fat stuff (35% fat or higher). Do not come at me with “light cream” or milk. We need FAT to trap air bubbles.
- Mascarpone Cheese: The MVP. This adds structure and a subtle tang that cuts through the sweetness. It keeps the whipped cream from weeping (turning into a puddle) later on.
- Granulated Sugar: Just enough to sweeten the deal. You can use powdered sugar if you’re worried about graininess, but granulated dissolves fine if you whip it right.
- Vanilla Extract: Use the real stuff. Or vanilla bean paste if you’re feeling fancy and want those little black specks to show off.
- Fresh Fruit:
- Strawberries: Look for medium-sized, uniform cones. Pointy is good.
- Kiwi: Peel it, obviously. Green or Gold works.
- Mango: The slippery eel of fruits, but delicious.
- Seedless Grapes: Shine Muscat grapes are the gold standard if you can find them (and afford them).
Step-by-Step Instructions
Alright, apron on. Wash your hands. Let’s build a sandwich.
1. Fruit Prep: The Drying Game
This is the most boring step, but skip it and you die. (Okay, you won’t die, but your sandwich will be soggy).
- Wash your fruit.
- Peel the kiwi and mango. Hull the strawberries (remove the green leafy top).
- CRITICAL STEP: Pat the fruit dry with paper towels. Then do it again. Any surface moisture on the fruit will prevent the cream from sticking to it. The fruit will slide right out of the sandwich like it’s on a water slide. We want dry fruit.
2. The Cream: Whipping Up a Storm
- In a large bowl (chilled if you want to be pro), combine the heavy cream, mascarpone, sugar, and vanilla.
- Using a hand mixer or stand mixer, beat this mixture. Start slow so you don’t spray your kitchen with dairy, then increase speed.
- Watch closely. We are looking for stiff peaks. This means when you lift the beater, the cream stands straight up like a soldier and doesn’t flop over.
- Science Note: If you under-whip, the sandwich collapses. If you over-whip, you make butter. Stop when it looks firm and matte, not curdled.
3. The Foundation
- Take two slices of bread. If you are a purist, cut the crusts off now. Some people cut them off after assembly, but I find it easier to do it now so I can see the workable surface area.
- Spread a thin layer of cream on both slices of bread. This acts as the glue (and moisture barrier) for the bread.
4. The Architecture (The Art of Placement)
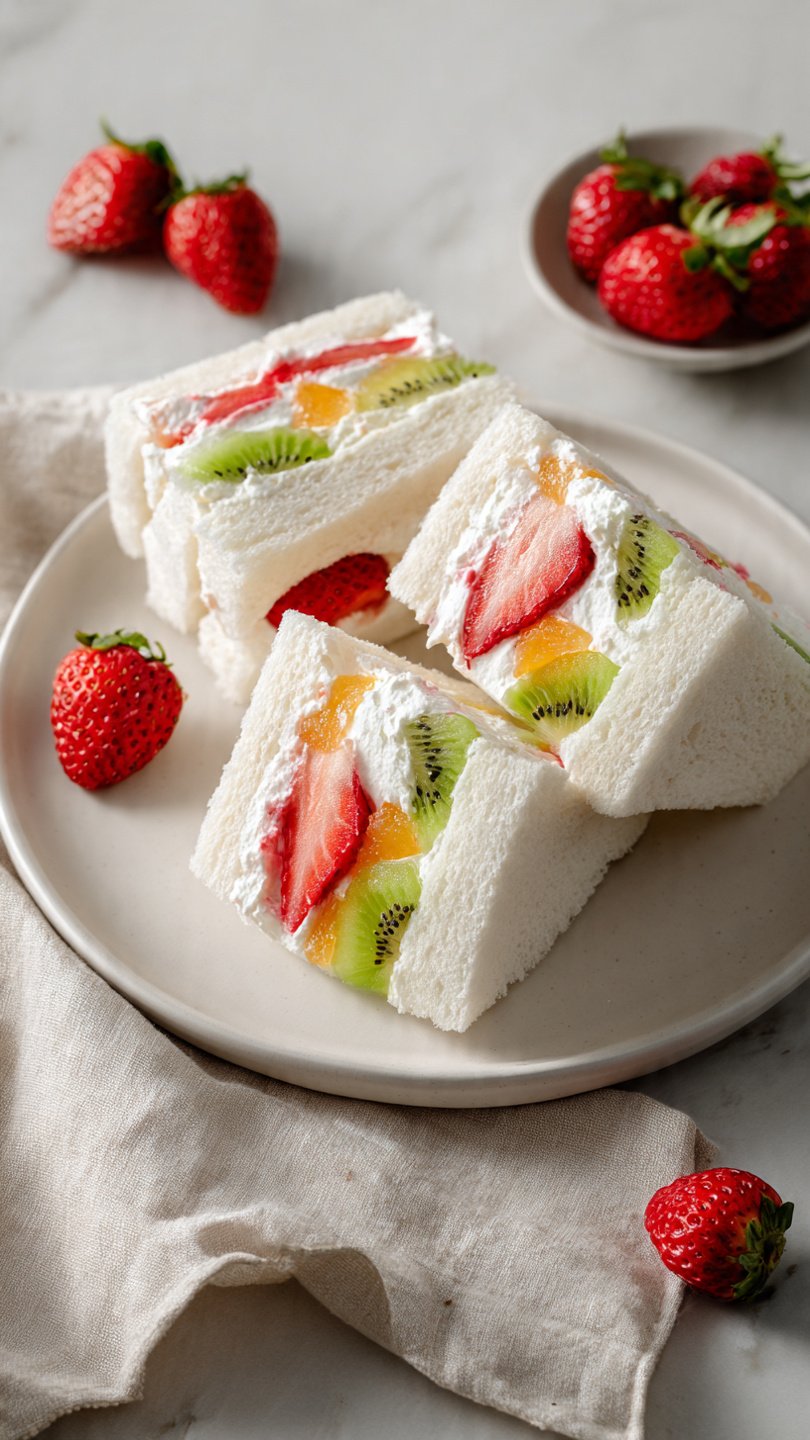
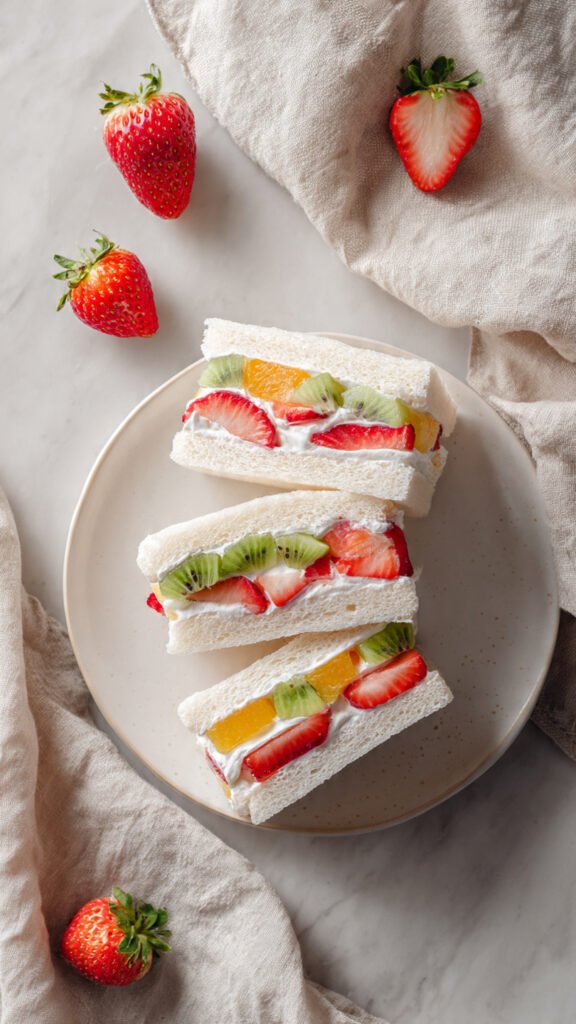
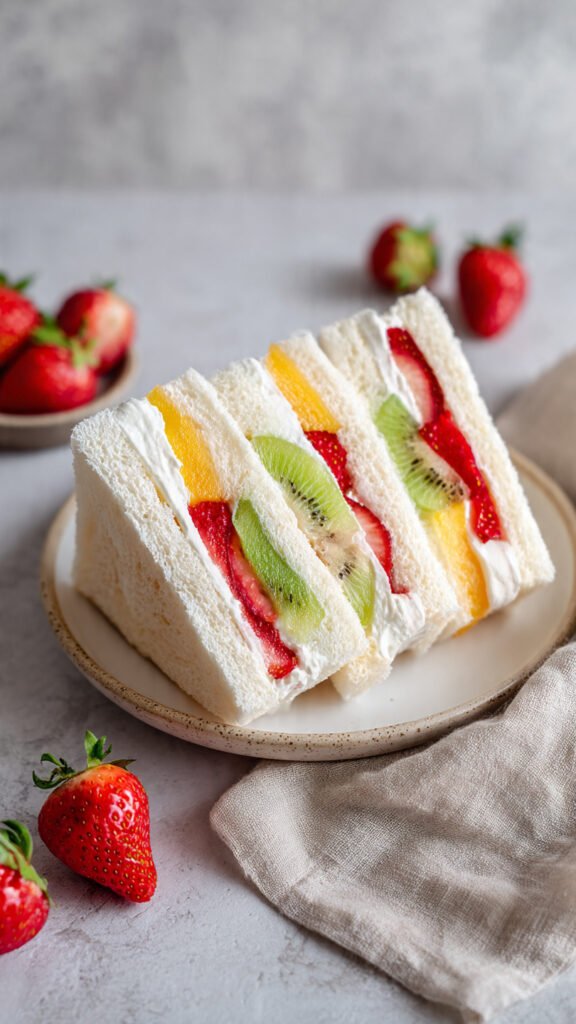
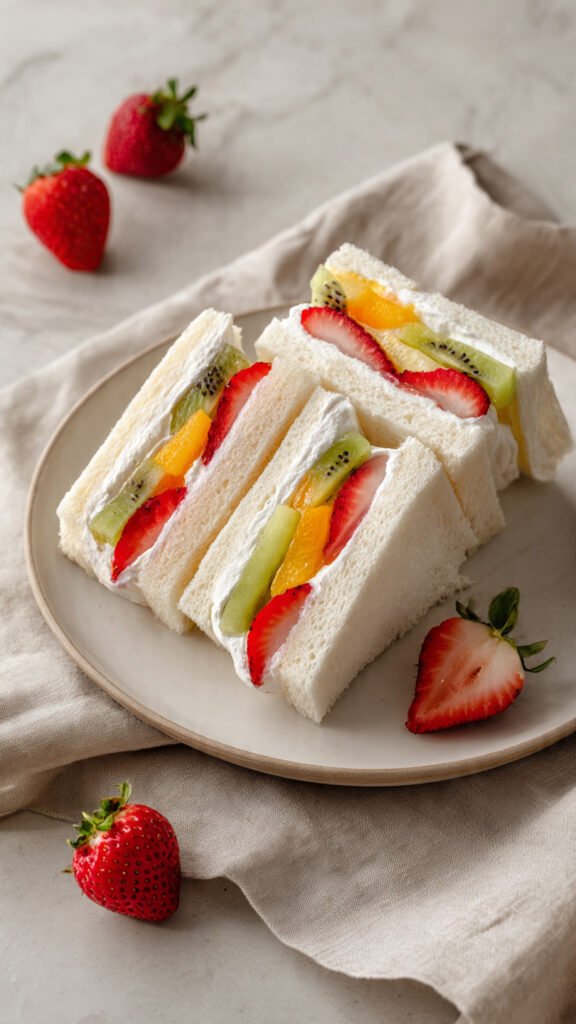
Here is where you have to use your brain. You need to think about where the knife will cut. We usually cut these diagonally (creating two triangles).
- The Centerpiece: Place your “hero” fruits (usually strawberries) along the diagonal line where you plan to cut.
- Tip: Place the strawberries tip-to-tip or butt-to-butt? No, place them standing up or laying down depending on size, but ensure the center of the berry is exactly on the diagonal line.
- The Fillers: Place smaller fruits (grapes, kiwi chunks) in the empty gaps around the main diagonal line. You want the sandwich to be full, but not exploding.
5. The Burial
- Take the rest of your whipped cream and gently pile it over the fruit.
- You need to fill every nook and cranny between the fruits. If you leave air pockets, your cross-section will have holes in it.
- Smooth the top into a dome shape.
- Place the second slice of bread (cream side down) on top.
- Squish Check: Place your palm flat on the sandwich and press down gently. Just enough to adhere everything together. Do not smash it.
6. The Long Wait (The Chill)
- Wrap the sandwich tightly in plastic wrap.
- Pro Tip: Use a permanent marker to draw a line on the outside of the plastic wrap indicating where the diagonal line of fruit is. Once it’s wrapped, it’s just a white square, and you will forget which way to cut.
- Put it in the fridge.
- Time: Minimum 1 hour. Ideally 4 hours. Or overnight. The bread needs to hydrate slightly from the cream, and the cream needs to set cold to solidify the fat structure. If you cut it now, it will explode. Patience.
7. The Grand Reveal
- Take the sandwich out. Unwrap it.
- Heat your knife: Run a sharp chef’s knife under hot water, then wipe it dry. A hot knife melts through the cream butterfat like… well, hot butter.
- Align your knife with that diagonal you memorized (or marked).
- Slice in one smooth motion if possible. Don’t saw back and forth like a lumberjack.
- Clean the knife before doing any other cuts.
- Open it up and gasp at your beauty.
Common Mistakes to Avoid
Don’t say I didn’t warn you.
- The “Butter” Incident: You got distracted while whipping the cream and now it looks yellow and chunky. You made sweet cheese-butter. It’s delicious on toast, but it’s not for this sandwich. Throw it out (or eat it) and start over.
- The “Slip ‘n Slide”: You didn’t dry the fruit. Now when you bite into it, the strawberry shoots out the back of the sandwich onto your lap.
- The “Hollow Earth”: You didn’t pack the cream in tight enough between the fruits. Your cross-section has gaps. It still tastes good, but Instagram will judge you.
- The “Impatient Chef”: You cut it after 15 minutes in the fridge. The cream squished out the sides. Sadness ensues.
- The Dull Knife: Using a dull knife or a serrated bread knife that tears the sponge. You need a sharp, straight edge for that glass-smooth finish.
Alternatives & Substitutions
Not feeling the standard strawberry vibe? Let’s mix it up.
- The Bread:
- Brioche: Richer, yellower, more buttery. Delicious, but heavier.
- Gluten-Free: Use a high-quality GF white bread. Toasting it very lightly might help structural integrity since GF bread tends to crumble.
- The Cream:
- Cream Cheese: Can be swapped for mascarpone, but it’s saltier and tangier. Add a little more sugar to balance it.
- Greek Yogurt: Don’t do it. It’s too wet. Unless you strain it for 24 hours (labneh style), it will wreck the bread.
- Vegan: Use coconut cream (the solidified part from a chilled can of full-fat coconut milk). Whip it with powdered sugar. It works surprisingly well!
- The Flavor Twists:
- Matcha: Add 1 tsp of matcha powder to the cream for a green tea version.
- Cocoa: Chocolate whipped cream with bananas? Yes, please.
- Oreo: Crush Oreos into the cream (cookies and cream style) and use bananas.
FAQ (Frequently Asked Questions)
Q: Can I make this the night before? A: Absolutely. In fact, it’s better the next day. The bread absorbs moisture and becomes almost cake-like. Just don’t leave it more than 24 hours, or the fruit might start to ferment or get slimy.
Q: Why is my cream runny? A: Either you didn’t whip it to stiff peaks, or your kitchen is too hot. If it’s 90 degrees in your kitchen, put the bowl in the freezer for 5 minutes before whipping.
Q: Do I really have to cut the crusts off? A: Look, I’m not the sandwich police. But the crust adds a chewy texture that fights against the “cloud-like” experience we are aiming for. Plus, the aesthetic is 50% of the appeal here. Cut them off and eat them as a snack while you wait.
Q: Can I use frozen fruit? A: No. Absolutely not. Put the bag down. Frozen fruit thaws and releases gallons of water. You will have a pink, soggy, disgusting soup sandwich. Fresh fruit only, please.
Q: Is this healthy? A: It has “fruit” in the name. Therefore, it counts as a salad. (Please don’t ask a nutritionist to verify this).
Q: What do I do with the leftover crusts? A: Cinnamon sugar croutons! Toss them in butter and sugar and bake them. Zero waste, baby.
Final Thoughts
There you have it. You are now a certified Fruit Sando Artist.
It’s creamy, it’s sweet, and it looks like something you paid $12 for at a trendy café in Tokyo. But you made it in your pajamas, which makes it infinitely better.
Don’t stress if your first attempt isn’t geometrically perfect. As long as it tastes like strawberries and cream on a cloud, you’re winning. Now, go take that photo for the ‘gram, and then destroy that sandwich. You’ve earned it!