Jelly Donut Recipe: The Ultimate Guide to Fluffy, Filled Perfection
👩🍳 The Busy Home Cook's Arsenal
Consistently cooking incredible meals for your family doesn't mean spending three hours in the kitchen every night. These are the 5 absolute life-saving appliances and culinary tools that dramatically cut down prep time while guaranteeing restaurant-quality results.
🌪️ Ninja 4-Quart Air Fryer
The machine that completely changed weeknight dinners. It preheats in seconds and cooks frozen vegetables, chicken wings, and battered fish to an incredibly crispy, deep-fried texture using 75% less oil and taking half the time of a traditional oven.
⏱️ Instant Pot Duo 7-in-1 Pressure Cooker
Forget slow cookers that take 8 hours. This legendary appliance aggressively pressure cooks tough cuts of meat into melt-in-your-mouth tender roasts, stews, and perfectly fluffy rice in under 45 minutes, saving you when you forget to defrost dinner.
🔪 Victorinox Fibrox Pro 8" Chef's Knife
A dull knife is dangerous and makes chopping vegetables a miserable chore. This exact blade reigns supreme in professional kitchens because it holds a terrifyingly sharp edge, features a non-slip grip, and costs significantly less than heavy German steel.
🌡️ ThermoPro Instant Read Thermometer
The secret difference between dry, rubbery chicken and juicy perfection. Stop nervously slicing your proteins open to check if they're done—this waterproof digital pen gives you a highly accurate temperature reading in less than three seconds.
🥤 Vitamix 5200 Professional-Grade Blender
Whether you are making silky-smooth breakfast smoothies, pureed soups from scratch, or blending absolutely lump-free sauces, this famously indestructible motor pulverizes anything you throw at it. It literally heats soup from the friction of the blades alone.
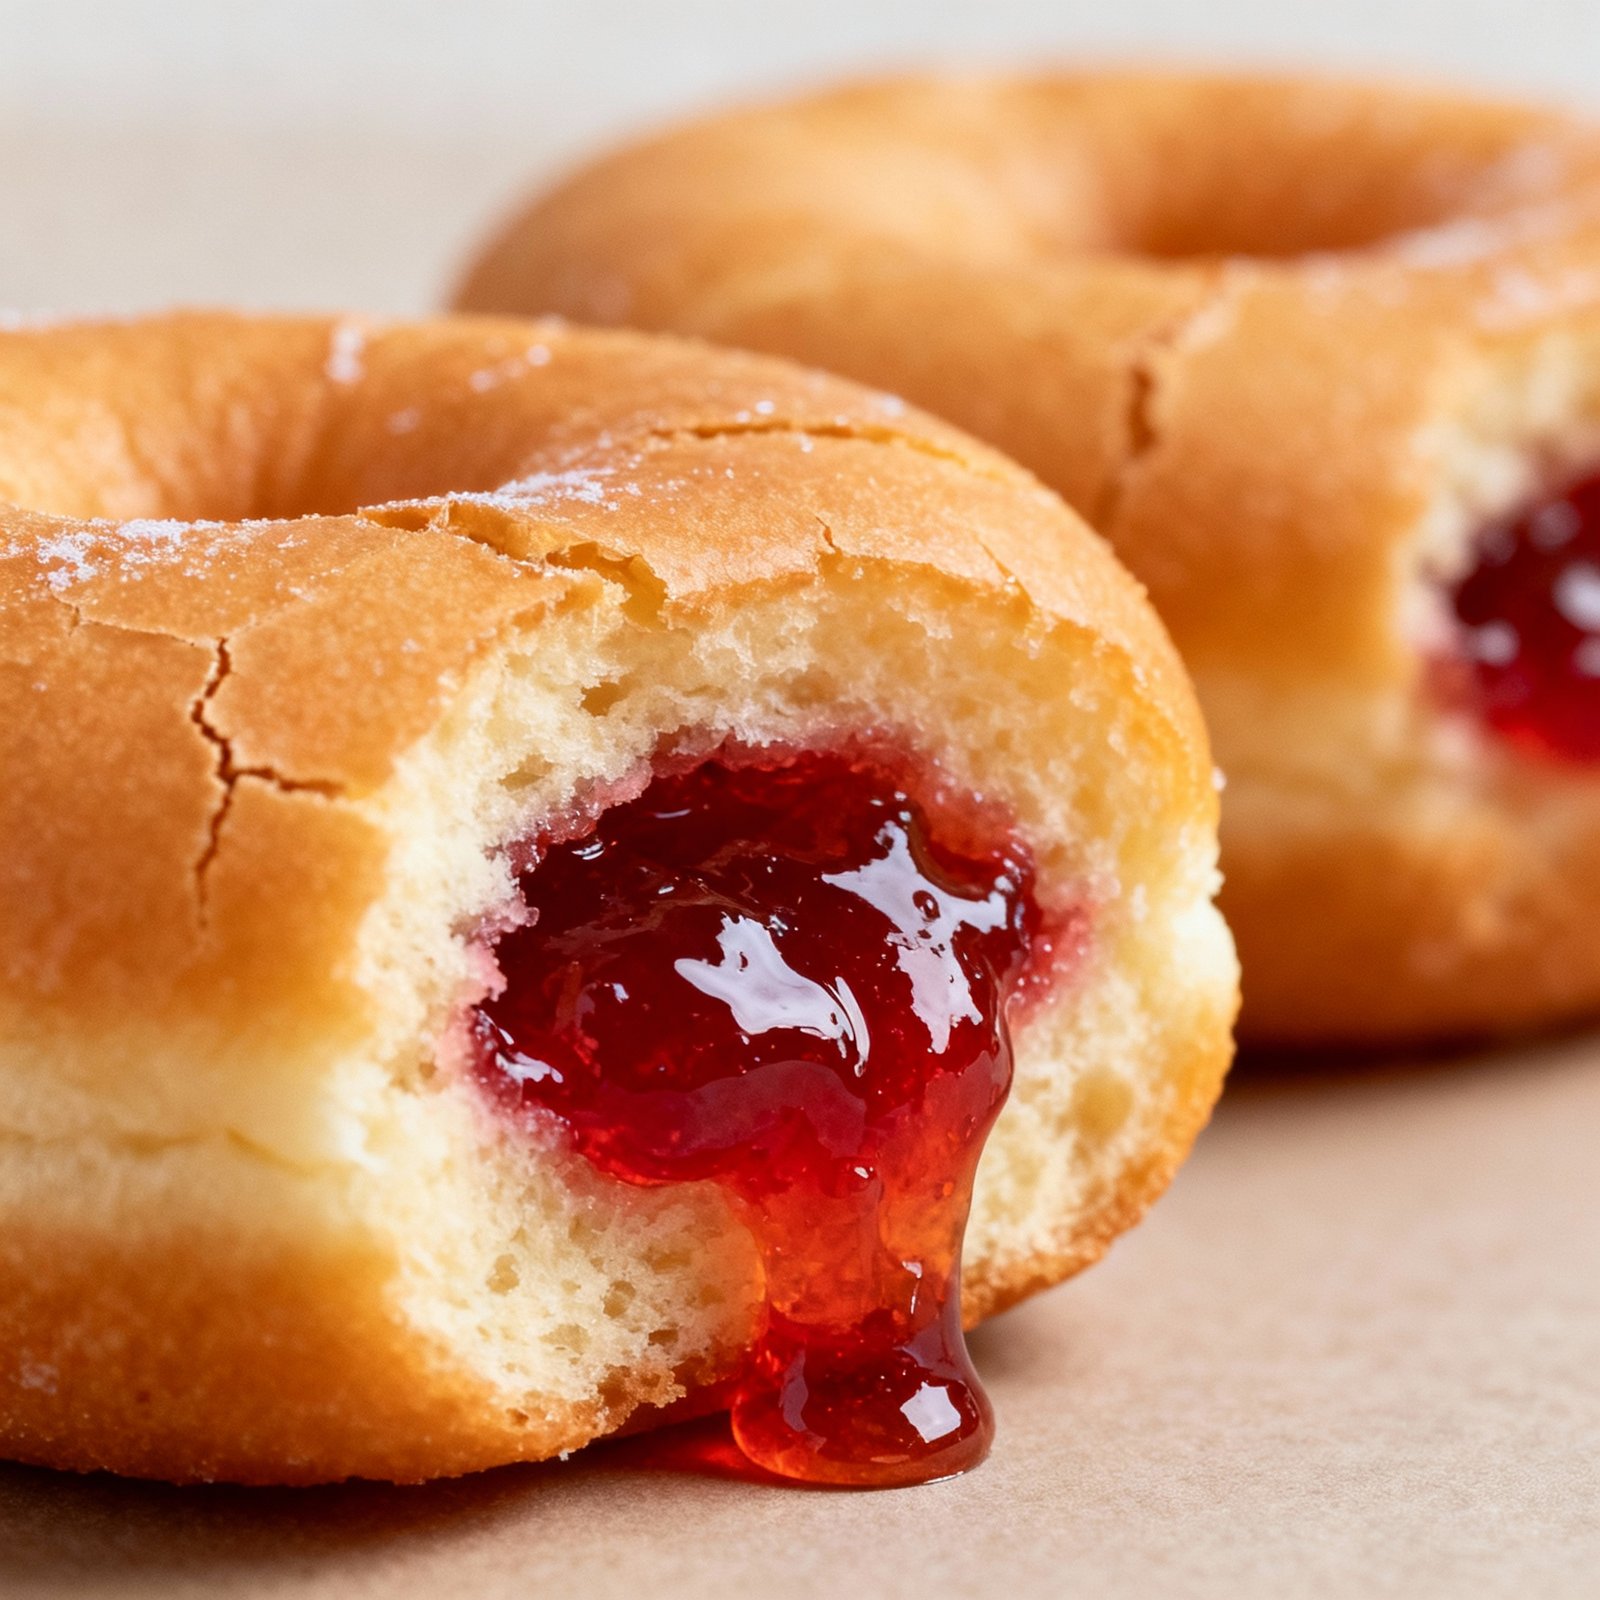
Is there anything quite as satisfying as biting into a warm, fluffy donut bursting with sweet, fruity jelly? Jelly donuts are a classic treat, beloved by kids and adults alike. But store-bought donuts can often be disappointing – greasy, stale, or lacking that homemade touch. This recipe empowers you to create bakery-worthy jelly donuts in your own kitchen, guaranteeing a melt-in-your-mouth experience every time. Get ready to indulge in the irresistible charm of freshly made, perfectly filled jelly donuts!
Why This Recipe Works
This recipe isn’t just about throwing ingredients together; it’s about understanding the science behind a great donut. Here’s why this recipe consistently delivers amazing results:
- Yeast Activation: We use a precise temperature range for activating the yeast, ensuring optimal rising power for a light and airy dough.
- Proper Gluten Development: The kneading process is crucial for developing gluten, which gives the donuts their structure and chewy texture. We guide you through the process to achieve the perfect balance.
- First Rise: A sufficient first rise allows the yeast to fully develop, creating a flavorful and airy dough. We provide clear instructions on judging when the dough is ready.
- Second Rise (Proofing): This second rise after shaping is essential for achieving that signature donut fluffiness. We emphasize the importance of a warm, draft-free environment.
- Frying Temperature: Maintaining the correct oil temperature is key to preventing greasy donuts. Too low, and the donuts will absorb too much oil; too high, and they’ll burn on the outside before cooking through. We offer tips on monitoring and adjusting the temperature.
- Jelly Filling Method: Our method for filling the donuts ensures even distribution of the jelly without making the donuts soggy.
- Sugar Coating: The simple sugar coating adds a touch of sweetness and visual appeal, completing the perfect jelly donut experience.
Ingredients
- For the Dough:
- 1 cup (240ml) warm milk (105-115°F)
- 2 ¼ teaspoons (1 packet) active dry yeast
- ¼ cup (50g) granulated sugar
- 1 teaspoon salt
- 2 large eggs, lightly beaten
- ¼ cup (60ml) vegetable oil
- 4 cups (500g) all-purpose flour, plus more for dusting
- For Frying:
- Vegetable oil, for frying (about 6-8 cups)
- For Filling:
- Your favorite jelly or jam (raspberry, strawberry, or grape are classic choices)
- For Coating:
- 1 cup (200g) granulated sugar
Instructions
- Activate the Yeast: In a large bowl, combine the warm milk, yeast, and sugar. Let it sit for 5-10 minutes, or until the yeast is foamy. This indicates the yeast is active.
- Combine Wet Ingredients: Add the salt, eggs, and vegetable oil to the yeast mixture. Whisk to combine.
- Add Dry Ingredients: Gradually add the flour, one cup at a time, mixing with a wooden spoon or spatula until a shaggy dough forms.
- Knead the Dough: Turn the dough out onto a lightly floured surface. Knead for 5-7 minutes, or until the dough is smooth and elastic. It should be slightly sticky but not unmanageable. You can also use a stand mixer with a dough hook for this step.
- First Rise: Place the dough in a lightly oiled bowl, turning to coat. Cover with plastic wrap or a clean kitchen towel. Let it rise in a warm place for 1-1.5 hours, or until doubled in size.
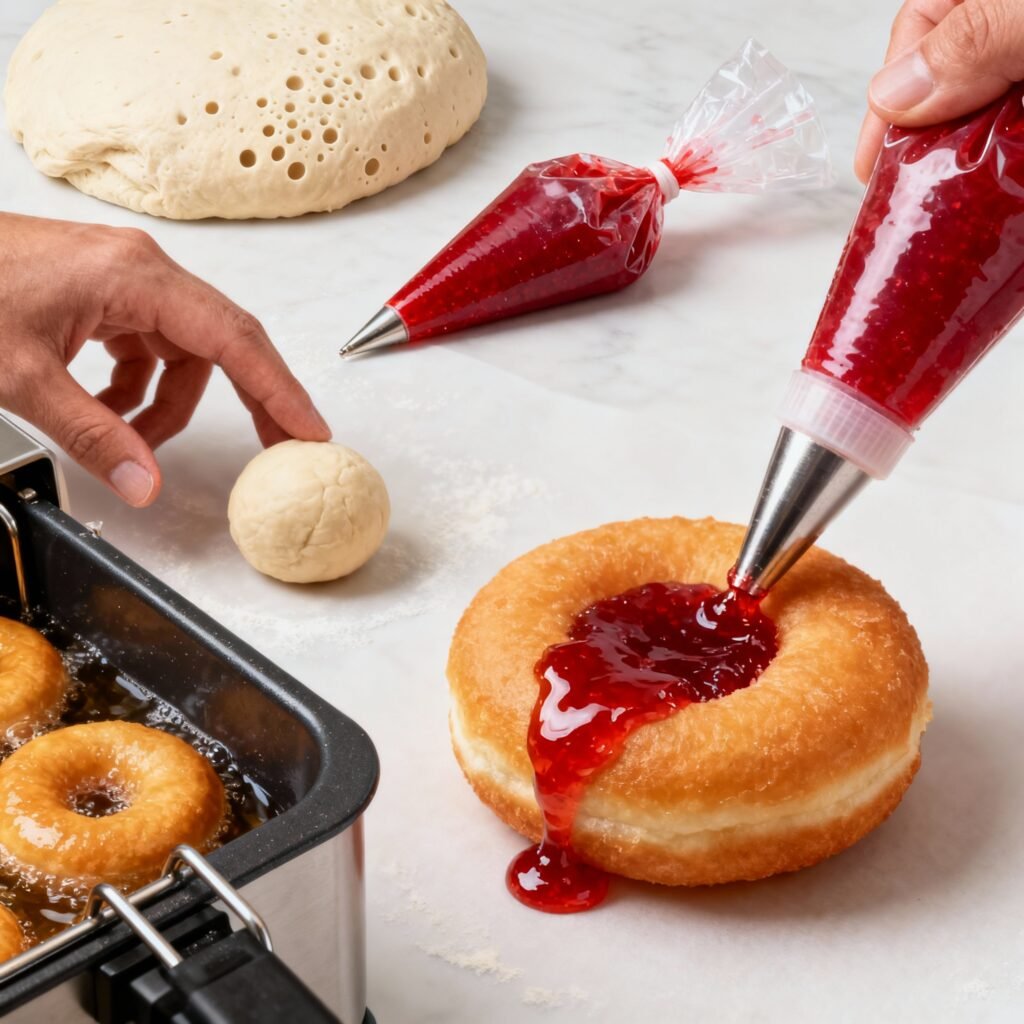
- Punch Down and Shape: Gently punch down the dough to release the air. Turn it out onto a lightly floured surface. Roll the dough to about ½ inch thickness. Use a 3-inch donut cutter to cut out donuts. Place the donuts on a baking sheet lined with parchment paper.
- Second Rise (Proofing): Cover the donuts loosely with plastic wrap or a clean kitchen towel. Let them rise in a warm place for 30-45 minutes, or until they are puffy and almost doubled in size.
- Prepare for Frying: While the donuts are proofing, heat about 2-3 inches of vegetable oil in a large, heavy-bottomed pot or Dutch oven to 350°F (175°C). Use a thermometer to monitor the temperature.
- Fry the Donuts: Carefully place 2-3 donuts at a time into the hot oil. Fry for 2-3 minutes per side, or until golden brown.
- Drain: Remove the donuts from the oil with a slotted spoon and place them on a wire rack lined with paper towels to drain excess oil.
- Coat with Sugar: While the donuts are still warm, roll them in granulated sugar to coat evenly.
- Fill with Jelly: Allow the donuts to cool slightly before filling. Use a piping bag fitted with a long, thin tip (or a decorating tip) to inject jelly into the side of each donut. Insert the tip about halfway into the donut and gently squeeze until the donut feels full. You can also use a small knife to create a small slit and then fill with a spoon, but a piping bag is much cleaner.
- Serve and Enjoy: Serve the jelly donuts warm and enjoy!
Tips for Success
- Yeast is Key: Make sure your yeast is fresh! Expired yeast won’t activate properly.
- Don’t Overheat the Milk: Milk that’s too hot can kill the yeast. Use a thermometer to ensure it’s within the recommended temperature range.
- Gentle Kneading: Over-kneading can result in tough donuts. Knead until the dough is smooth and elastic, but not overly firm.
- Warm Rising Environment: A warm environment is essential for proper rising. If your kitchen is cold, try placing the dough in a slightly warmed oven (turned off!) or near a warm appliance.
- Maintain Oil Temperature: Use a thermometer to monitor the oil temperature and adjust the heat as needed to keep it consistent.
- Don’t Overcrowd the Pot: Frying too many donuts at once will lower the oil temperature and result in greasy donuts.
- Cool Slightly Before Filling: Filling the donuts while they are too hot can cause the jelly to melt and seep out.
Storage Instructions
Jelly donuts are best enjoyed fresh. However, if you have leftovers, store them in an airtight container at room temperature for up to 2 days. The sugar coating may become slightly sticky over time. You can also freeze the unfilled donuts for up to 2 months. Thaw them completely before filling and coating.

FAQ
- Can I use instant yeast instead of active dry yeast? Yes, you can. Use the same amount (2 ¼ teaspoons or 1 packet). You don’t need to proof instant yeast in warm milk; you can add it directly to the dry ingredients.
- Can I use a different type of flour? All-purpose flour is recommended for this recipe. Bread flour will result in a chewier donut, while cake flour will be too soft.
- Can I bake the donuts instead of frying? While it’s possible to bake donuts, they won’t have the same texture as fried donuts. They will be more cake-like. If you choose to bake them, bake at 375°F (190°C) for 12-15 minutes, or until golden brown.
- What if I don’t have a donut cutter? You can use a cookie cutter or even a glass or jar to cut out the donuts.
- Can I use a different filling? Absolutely! Get creative with your fillings. Try pastry cream, chocolate ganache, or even peanut butter.
🍽️ The Entertainer's Presentation Kit
We eat with our eyes first. If you love hosting friends for dinner, drinks, or holiday parties, these 5 elegant serving upgrades instantly transform casual home cooking into a luxurious, highly photogenic fine-dining experience.
🍲 Le Creuset Enameled Cast Iron Dutch Oven
The ultimate flex for a dinner party. You can braise short ribs or bake sourdough bread in the oven, then bring this stunning enameled pot directly to the center of your dining table to serve your guests from its wildly beautiful colored casing.
🍷 RIEDEL Crystal Wine Glass Set
Stop serving good wine in cheap, thick-rimmed glasses. The remarkably thin crystal lip and specifically engineered bowl shapes of these glasses genuinely elevate the aroma and flavor profiles of your favorite vintages, making a $15 bottle taste significantly more expensive.
🧀 Premium Bamboo Charcuterie Board Set
The easiest appetizer strategy ever invented. This massive carved board features hidden slide-out drawers containing stainless steel cheese knives and ceramic ramekins, giving you the perfect canvas to build massive, Instagram-worthy grazing spreads.
✨ Genuine Marble Drink Coasters
A simple, brilliant aesthetic upgrade that protects your expensive furniture. These heavy, elegant real marble coasters with subtle gold accents look incredibly chic tossed around a living room while completely preventing water rings from sweaty cocktails.
🌿 100% Cotton Cloth Dinner Napkins
Throwing away a mountain of paper towels at a dinner party ruins the vibe. Swapping to soft, highly-absorbent, fully machine-washable cloth napkins instantly pulls a tablescape together and makes even a Tuesday night pizza feel like a fancy event.
Conclusion
Making jelly donuts at home may seem daunting, but with this recipe and a little patience, you can create a truly unforgettable treat. The satisfaction of biting into a warm, homemade jelly donut is well worth the effort. So, gather your ingredients, put on your apron, and get ready to experience the joy of donut-making! Happy baking!