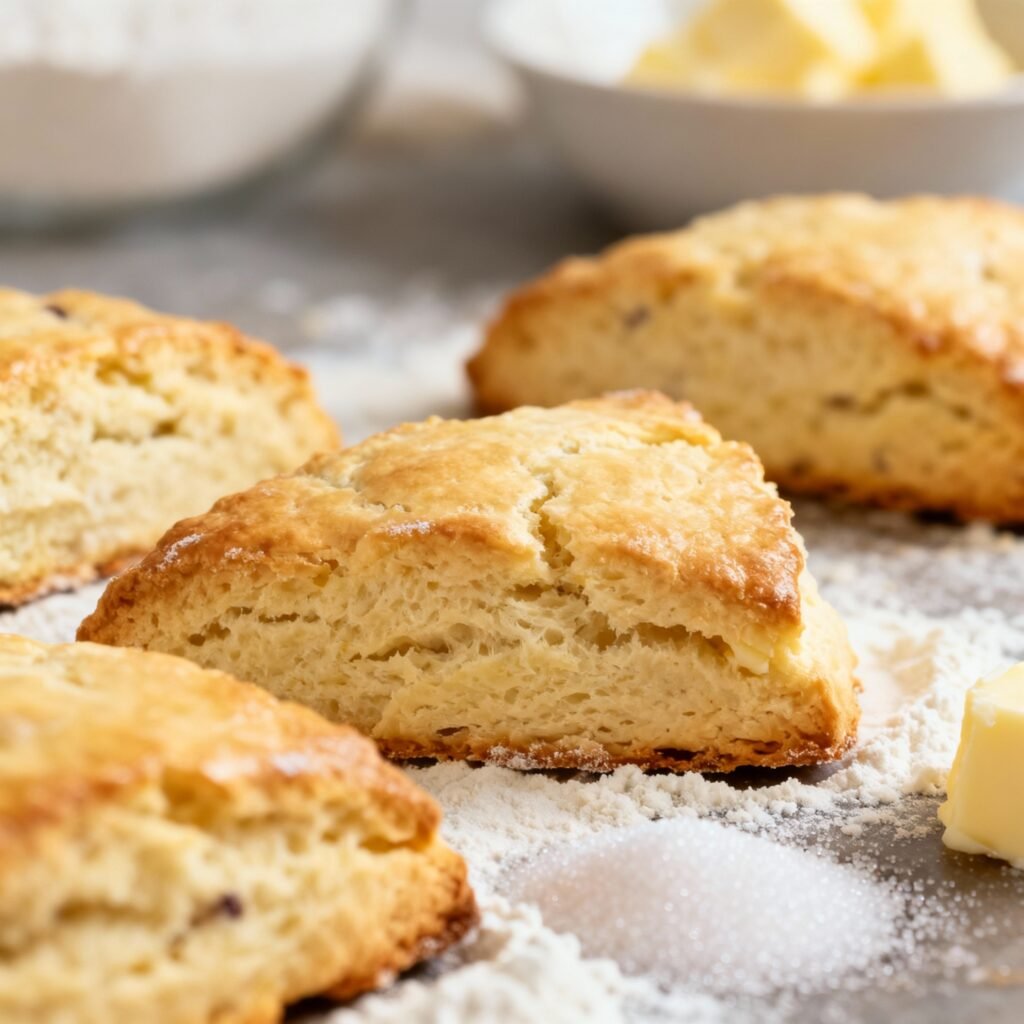
Simple Scone Recipe: Buttery, Flaky Perfection in Minutes!
Is there anything quite as comforting as a warm, freshly baked scone? Whether it’s slathered with clotted cream and jam for a proper afternoon tea or enjoyed with a simple pat of butter alongside a steaming cup of coffee, scones are a versatile treat that always hits the spot. But the thought of making them can sometimes feel daunting. All that talk of cold butter and delicate handling! Fear not, because this recipe is here to banish those baking anxieties. This is a truly simple scone recipe, designed for busy lives and beginner bakers, guaranteeing buttery, flaky perfection without the fuss. Get ready to impress yourself (and anyone lucky enough to share them) with these incredibly easy and delicious scones!
Why This Recipe Works
This recipe takes the intimidation out of scone-making by focusing on a few key principles that ensure success every time:
- Cold Ingredients are Key: We emphasize using very cold butter and milk. Cold butter creates steam as it bakes, resulting in those delightful flaky layers.
- Minimal Mixing: Overmixing develops gluten, leading to tough scones. This recipe encourages a light hand, just enough to bring the dough together.
- Simple Ingredients: No fancy ingredients required! This recipe relies on pantry staples, making it perfect for a spontaneous baking session.
- Clear Instructions: The step-by-step instructions are detailed and easy to follow, guiding you through each stage of the process with confidence.
- Adaptable: While this recipe is perfect as is, it’s also a fantastic base for adding your favorite mix-ins, from dried fruit to chocolate chips.
Ingredients
- 2 cups (250g) All-Purpose Flour, plus extra for dusting
- 1/4 cup (50g) Granulated Sugar
- 1 tablespoon Baking Powder
- 1/4 teaspoon Salt
- 1/2 cup (1 stick, 113g) Cold Unsalted Butter, cut into cubes
- 3/4 cup (180ml) Cold Milk, plus extra for brushing
- Optional: 1 teaspoon Vanilla Extract
Instructions
- Preheat and Prep: Preheat your oven to 400°F (200°C). Line a baking sheet with parchment paper.
- Combine Dry Ingredients: In a large bowl, whisk together the flour, sugar, baking powder, and salt.
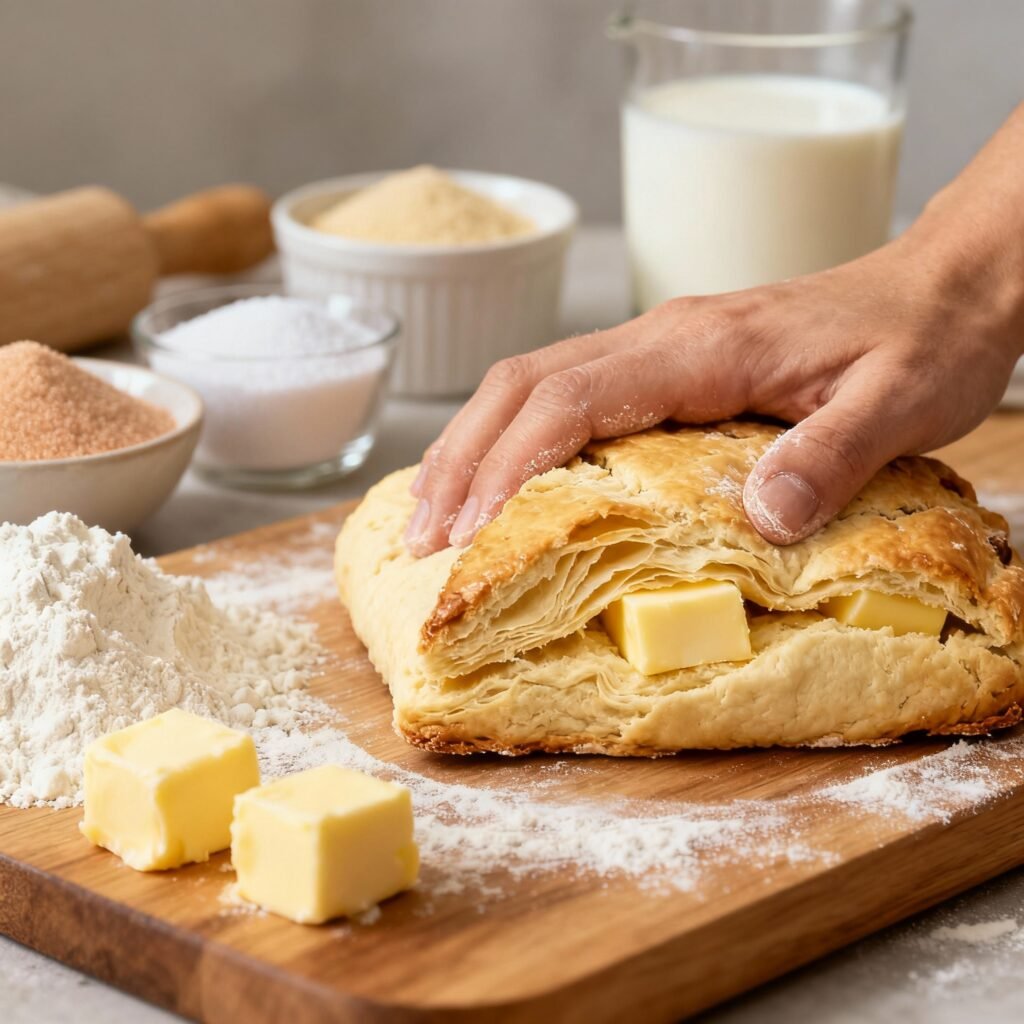
- Cut in the Butter: Add the cold, cubed butter to the dry ingredients. Using a pastry blender or your fingertips, cut the butter into the flour mixture until it resembles coarse crumbs. You should still see small pieces of butter. The colder the butter stays, the better the scones will be.
- Add Wet Ingredients: Add the cold milk (and vanilla extract, if using) to the bowl. Stir gently with a fork until just combined. Do not overmix! The dough will be shaggy and slightly sticky.
- Turn Out and Shape: Turn the dough out onto a lightly floured surface. Gently pat the dough into a circle about 1 inch thick.
- Cut the Scones: Using a sharp knife or a biscuit cutter (about 2-3 inches in diameter), cut out the scones. Try to cut straight down without twisting the cutter to avoid sealing the edges. This will help them rise higher.
- Place on Baking Sheet: Place the scones onto the prepared baking sheet, leaving a little space between each one.
- Brush with Milk: Brush the tops of the scones with a little milk. This will help them brown beautifully in the oven.
- Bake: Bake for 15-20 minutes, or until the scones are golden brown on top and slightly firm to the touch.
- Cool and Serve: Let the scones cool on the baking sheet for a few minutes before transferring them to a wire rack to cool completely (or enjoy them warm!). Serve with your favorite toppings, such as clotted cream, jam, butter, or honey.
Tips for Success
- Keep it Cold: This cannot be stressed enough! The colder the butter, the flakier the scones. Consider chilling the flour and bowl beforehand for even better results.
- Don’t Overmix: Overmixing develops gluten, leading to tough scones. Mix the dough just until the ingredients are combined. A few streaks of flour are perfectly fine.
- Handle with Care: Be gentle when shaping and cutting the scones. Rough handling can compress the dough and prevent them from rising properly.
- Cut Straight Down: When using a biscuit cutter, avoid twisting it. Twisting seals the edges and hinders the rise.
- Baking Time: Baking times may vary depending on your oven. Keep a close eye on the scones and adjust the baking time as needed. They are done when golden brown and slightly firm.
- Experiment with Flavors: Feel free to add your favorite mix-ins to the dough. Dried cranberries, blueberries, chocolate chips, nuts, or even savory herbs and cheese can transform these simple scones into something truly special. Add about 1/2 cup of mix-ins to the dry ingredients before adding the butter.
- Make Ahead Tip: You can prepare the dough ahead of time, shape the scones, and store them in the refrigerator (covered) for up to 24 hours before baking. Add a few extra minutes to the baking time.
Storage Instructions
Scones are best enjoyed fresh, but they can be stored in an airtight container at room temperature for up to 2 days. For longer storage, freeze baked scones in an airtight container for up to 2 months. To reheat frozen scones, thaw them at room temperature and then warm them in a preheated oven at 350°F (175°C) for a few minutes.
FAQ
Q: Can I use salted butter?
A: Yes, you can, but omit the salt in the recipe.
Q: Can I use a different type of milk?
A: Yes, you can use whole milk, 2% milk, or even a plant-based milk alternative like almond milk or soy milk. The texture may vary slightly.
Q: Can I make these gluten-free?
A: Yes, you can substitute the all-purpose flour with a gluten-free all-purpose flour blend. Be sure to use a blend that contains xanthan gum or guar gum for best results.
Q: My scones didn’t rise very much. What went wrong?
A: Several factors can affect the rise of scones. Make sure your baking powder is fresh, avoid overmixing the dough, and ensure your butter is very cold. Also, avoid twisting the biscuit cutter when cutting out the scones.
Q: Can I make these scones ahead of time?
A: Yes, you can prepare the dough ahead of time, shape the scones, and store them in the refrigerator (covered) for up to 24 hours before baking. Add a few extra minutes to the baking time. You can also freeze baked scones for longer storage.
Conclusion
So there you have it! A simple scone recipe that delivers consistently delicious results. With a little attention to detail and a few key techniques, you can easily create bakery-worthy scones in your own kitchen. Whether you’re looking for a quick breakfast treat, a delightful afternoon snack, or a sweet ending to a meal, these scones are sure to please. Now go ahead, preheat that oven, and get ready to enjoy the irresistible aroma of freshly baked scones. Happy baking!