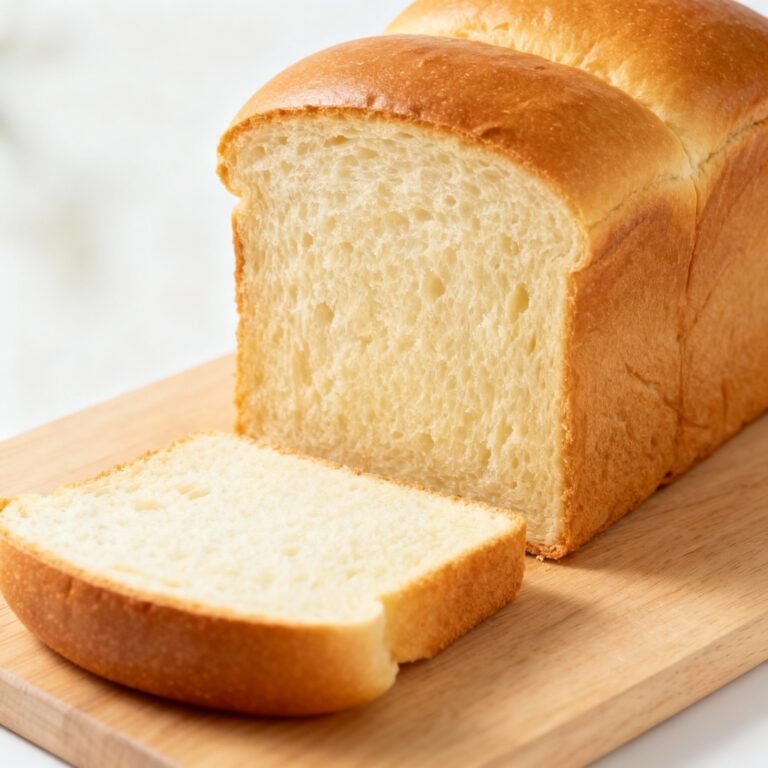
🌾 Sorghum Bread Recipe (Soft & Gluten-Free)
So you’ve decided to venture into the wild world of gluten-free baking. Maybe your stomach has declared war on wheat, or maybe you’re just trying to be trendy. Whatever the reason, you’re probably expecting the result to taste like a compressed sawdust brick.
Stop right there.
We don’t do sad bread here. We are making sorghum bread that actually tastes like bread. You know, the kind that bends without snapping, smells like heaven, and toasts up beautifully for your morning avocado rituals. If you’re craving something tasty but too lazy to spend forever kneading dough that might not even rise, huh? Same. This recipe is your new best friend.
Why This Recipe is Awesome
Look, I get it. The gluten-free aisle at the grocery store is a tragic place. You pay $8 for a loaf the size of a deck of cards, and it has the texture of a yoga mat. It’s offensive, honestly.
This sorghum bread recipe is the antidote to that misery. Here is why you are going to obsess over it:
1. Sorghum is the MVP of Ancient Grains If you aren’t familiar with sorghum, let me introduce you. It’s an ancient cereal grain that’s been around forever (mostly in Africa and Asia), and it is naturally gluten-free. Unlike rice flour, which can be gritty, or bean flours, which can taste like… well, beans, sorghum has a mild, slightly sweet, and nutty flavor. It mimics the taste of whole wheat better than any other GF flour. It’s earthy without tasting like dirt.
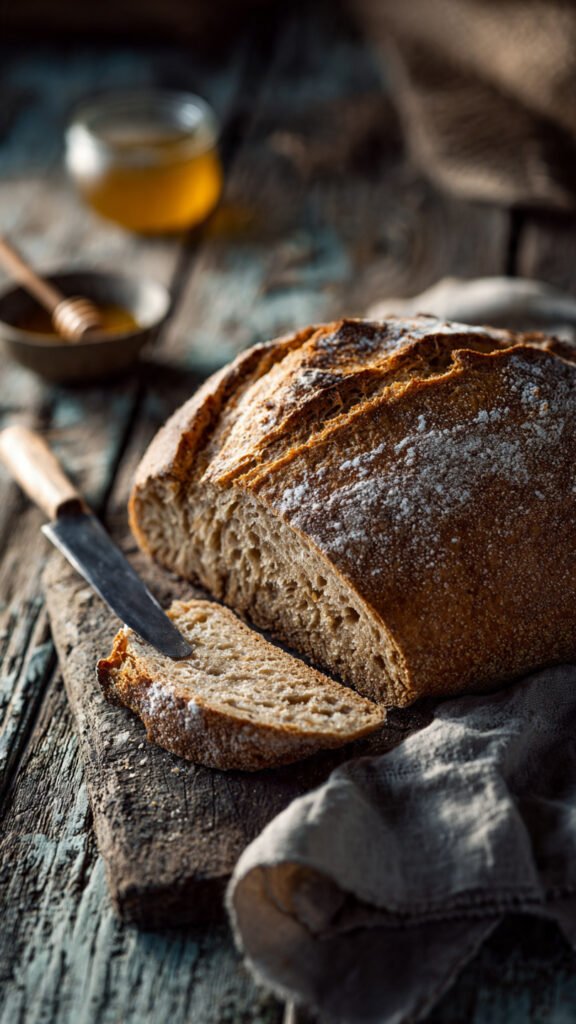
2. The Texture is Actually Legit The biggest complaint with GF bread is the “crumble factor.” You look at it wrong, and it disintegrates. This recipe uses a specific hydration balance and the magic of psyllium husk (we’ll get to that weird ingredient later) to create a crumb that holds together. You can make a sandwich with this. You can put it in a toaster. You can aggressively butter it. It survives.
3. It’s a “Batter Bread” (No Kneading!) This is the best part. Traditional bread requires muscle. You have to knead it to develop gluten strands. Since we have zero gluten here, kneading is pointless. In fact, it’s counterproductive. This dough comes together like a thick cake batter. You mix it, dump it in a pan, and let the yeast do the heavy lifting. It is dangerously easy.
4. It’s Customizable Once you nail this base, you can go wild. Add rosemary and olives? delicious. Cinnamon and raisins? Do it. Jalapeños and cheddar? You’re speaking my language. This is a blank canvas for your culinary genius.
Ingredients You’ll Need
Don’t panic. You might need to hit up the “health food” section or order one thing online, but it’s worth it. Here is your shopping list for success:
- Sorghum Flour: The star of the show. Make sure it’s “sweet white sorghum flour” for the best texture. If it smells rancid, toss it (flours have expiration dates, people!).
- Tapioca Starch (or Potato Starch): Sorghum on its own is a bit heavy. The starch lightens the load, making the bread fluffy rather than dense. It provides the “lift.”
- Psyllium Husk (Whole or Powder): Okay, hear me out. This sounds like something your grandma takes for digestion, and… it is. But in baking, it acts as the “glue.” It mimics gluten by binding water and creating structure. Do not skip this. Without it, you’re making sand.
- Active Dry Yeast: The little fungus that could. It makes the bubbles.
- Warm Water: Not boiling (you’ll kill the yeast), not cold (the yeast will stay asleep). Think “bathwater for a baby” temperature.
- Honey or Maple Syrup: Yeast needs a snack to get started. Sugar feeds the yeast so it creates gas (bubbles).
- Olive Oil (or Melted Butter): Fat equals flavor and moisture. It keeps the bread soft for days.
- Apple Cider Vinegar: This helps strengthen the structure and gives the yeast an extra kick.
- Salt: Because unsalted bread tastes like disappointment.
- Egg Whites (Optional but Recommended): These add protein structure. If you are vegan, you can skip them or use aquafaba, but the loaf might be slightly shorter.
Step-by-Step Instructions
Alright, apron up. Or don’t, I’m not your mom. Let’s make some magic.
1. Wake Up the Yeast
First, we need to make sure your yeast is actually alive. In a small bowl or measuring cup, combine your warm water, honey/sugar, and the yeast.
- The Science: You are looking for “blooming.” After about 5–10 minutes, the mixture should look foamy and smell like a brewery. If it just sits there looking like dirty water, your yeast is dead. Throw it out and buy fresh stuff. Do not pass Go.
2. Gel the “Glue” (The Psyllium Gel)
While the yeast is partying, mix your psyllium husk with a portion of the water (check the specific recipe measurements below).
- Visual Cue: It will turn into a weird, thick jelly almost instantly. It looks like slime. This is good. This slime is what prevents your bread from crumbling into oblivion.

3. Whisk the Dry Stuff
In a large mixing bowl (or the bowl of your stand mixer), whisk together the sorghum flour, tapioca starch, and salt.
- Tip: Whisking aerates the flour and ensures you don’t get a mouthful of pure salt later.
4. The Great Unification
Pour the foamy yeast mixture, the psyllium slime gel, the olive oil, the vinegar, and the egg whites into the dry ingredients.
- Mix it up: Use a paddle attachment or a sturdy wooden spoon. Beat this mixture on medium-high speed for about 3–4 minutes.
- Texture Check: This will not look like dough. It will look like a thick, sticky cookie batter or heavy cake batter. Do not add more flour. Trust the process. It’s supposed to be sticky.
5. Pan and Proof
Grease a 9×5 inch loaf pan heavily. Scoop the batter into the pan.
- Smoothing: Wet a spatula or your fingers with water and smooth the top of the loaf. Since there’s no gluten, the bread won’t smooth itself out in the oven; if it goes in lumpy, it comes out lumpy.
- The Rise: Cover it with a damp towel or plastic wrap sprayed with oil. Let it sit in a warm, draft-free spot for 45–60 minutes. It should rise just to the top of the pan.
- Warning: Do not let it over-rise (spilling over the edges). Unlike wheat bread, GF bread structure is fragile. If it rises too high, it will collapse in the oven and break your heart.
6. The Bake
Preheat your oven to 375°F (190°C) while the bread rises.
- Steam Trick: If you want a crusty top, throw a few ice cubes on the bottom floor of your oven right when you put the bread in. The steam helps the crust develop.
- Timing: Bake for roughly 50–60 minutes. The top should be golden brown.
- The Knock Test: Take it out and carefully tap the top. It should sound hollow. Internal temp should be around 205°F–210°F.
7. The Hardest Part: Waiting
Remove the bread from the pan and let it cool on a wire rack.
- CRITICAL RULE: Do not slice this bread until it is completely cool. I mean room temperature.
- Why? Gluten-free bread continues to cook and set while it cools. The starches are still gelatinizing. If you cut it hot, the steam escapes too fast, and the texture turns into a gummy, sticky mess. Patience is the hardest ingredient, but you need it.
Common Mistakes to Avoid
Even the best of us mess up. Here is how to avoid the “Facepalm” moments:
- Swapping Flours Willy-Nilly: You cannot swap sorghum flour 1:1 for almond flour or coconut flour. Baking is chemistry, not jazz. Stick to the ratios or use a trusted conversion chart.
- Using “Xanthan Gum” Only: While xanthan gum is a common binder, for a high-rise loaf like this, psyllium husk is superior. Xanthan gum can sometimes make bread feeling a bit… rubbery.
- Slicing Too Early: I mentioned this above, but I’m saying it again because it’s the #1 rookie mistake. If you slice it hot, you ruin the loaf. Don’t do it.
- Measuring Flour by Volume: If you can, use a kitchen scale. Scooping a cup of flour can vary wildly in weight depending on how packed it is. Too much flour = dry brick. Too little = soggy sadness.
- The Oven Peeker: Don’t open the oven door during the first 30 minutes. The temperature drop can cause your beautiful loaf to deflate like a sad balloon.
Alternatives & Substitutions
Cooking is about flexibility (mostly). Here are some swaps if your pantry is lacking:
- No Sorghum? If you clicked a recipe for sorghum bread but don’t have sorghum… weird choice, but okay. You can substitute oat flour (certified GF) or brown rice flour, though the flavor profile will change. Sorghum is sweeter; rice is blander.
- Vegan? Swap the egg whites for aquafaba (the liquid from a can of chickpeas). Whip it until frothy before adding. It works surprisingly well. Use maple syrup instead of honey.
- Starch Swap: If you don’t have tapioca starch, cornstarch or arrowroot powder works fine. Potato starch is the fluffiest, but the others will get the job done.
- Sweetener: Molasses creates a beautiful dark color and rich flavor if you want a “brown bread” vibe.
- Yeast: Instant yeast works too; you just don’t need to bloom it in water first, just mix it with the dry ingredients. But I prefer Active Dry to ensure it’s alive before wasting my flour.
FAQ (Frequently Asked Questions)
Q: Can I freeze this bread? A: Absolutely. In fact, I insist on it. Slice the whole loaf once it’s cool, put parchment paper between slices, and freeze. Pop a frozen slice directly in the toaster. It’s better than fresh.
Q: Why did my bread sink in the middle? A: Ah, the dreaded crater. This usually means it rose too much before baking (over-proofed) or there was too much liquid in the batter. Next time, reduce the rise time by 10 minutes.
Q: Can I use a bread machine? A: You can, but make sure your machine has a “Gluten-Free” setting. GF bread needs only one mix and one rise. Standard settings that “punch down” the dough for a second rise will destroy your sorghum structure.
Q: My dough is really sticky, should I add more flour? A: NO. Step away from the flour bag! It is supposed to be sticky. It’s a hydration-heavy batter. If you make it look like traditional dough, you will bake a stone.
Q: Does this taste like cardboard? A: Did you read the intro? No! The sorghum gives it a mild, wheaty taste, and the olive oil keeps it rich. It’s genuinely good. I wouldn’t lie to you.
Q: Can I use baking powder instead of yeast? A: That would make it a “quick bread” (like banana bread), not a yeast bread. It will be denser and won’t have that sandwich-bread flavor. Stick to yeast for the real deal.
Final Thoughts
Look at you, making artisan gluten-free bread from scratch! That is some serious kitchen wizardry. You’ve conquered the fear of the flat loaf and mastered the weird science of psyllium husk.
This sorghum bread recipe is a staple. It’s cheaper than store-bought, healthier (no weird preservatives), and your kitchen currently smells amazing. Whether you slather it in jam, use it for a grilled cheese, or just eat a slice plain because you can’t wait—enjoy it.
Now go impress someone—or yourself—with your new culinary skills. You’ve earned it!