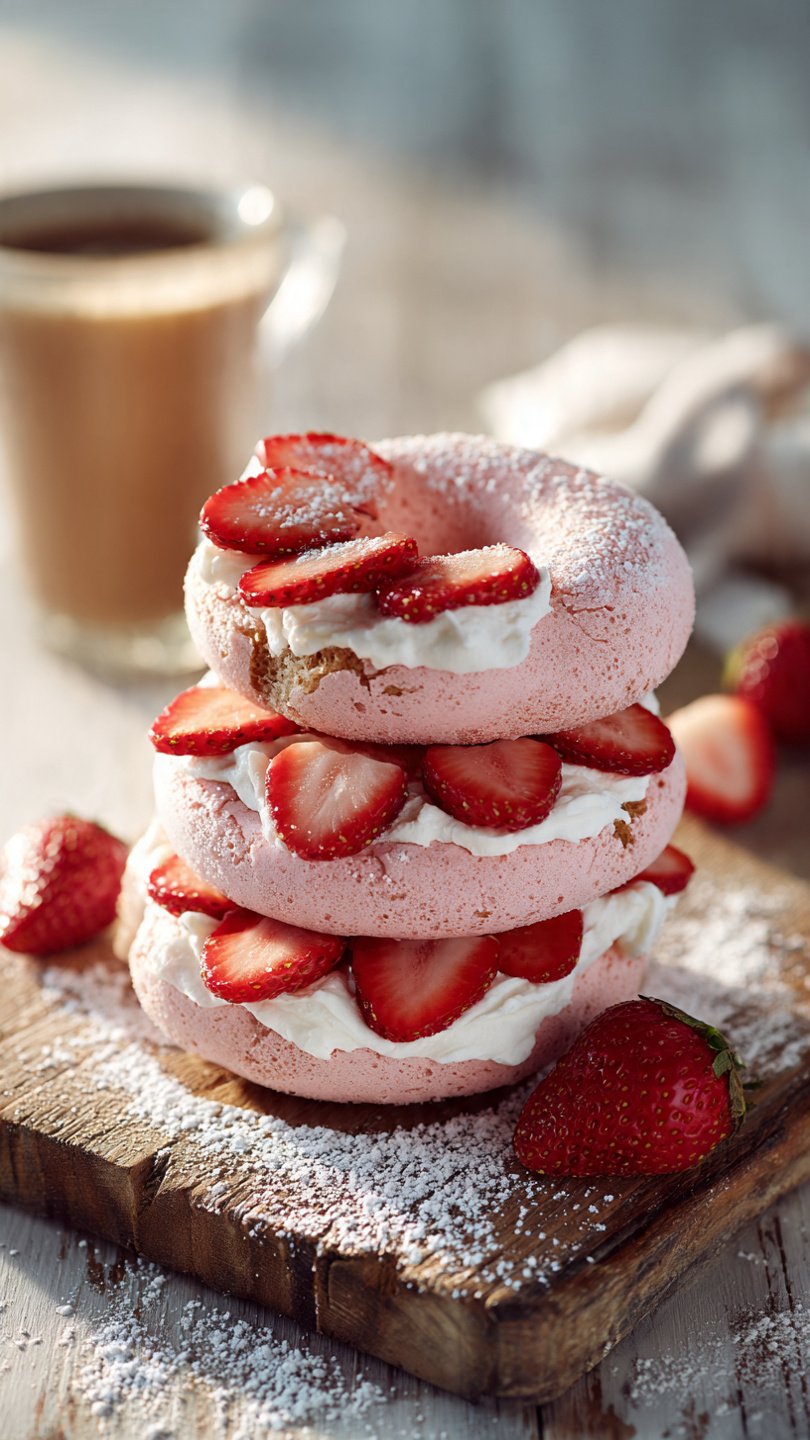
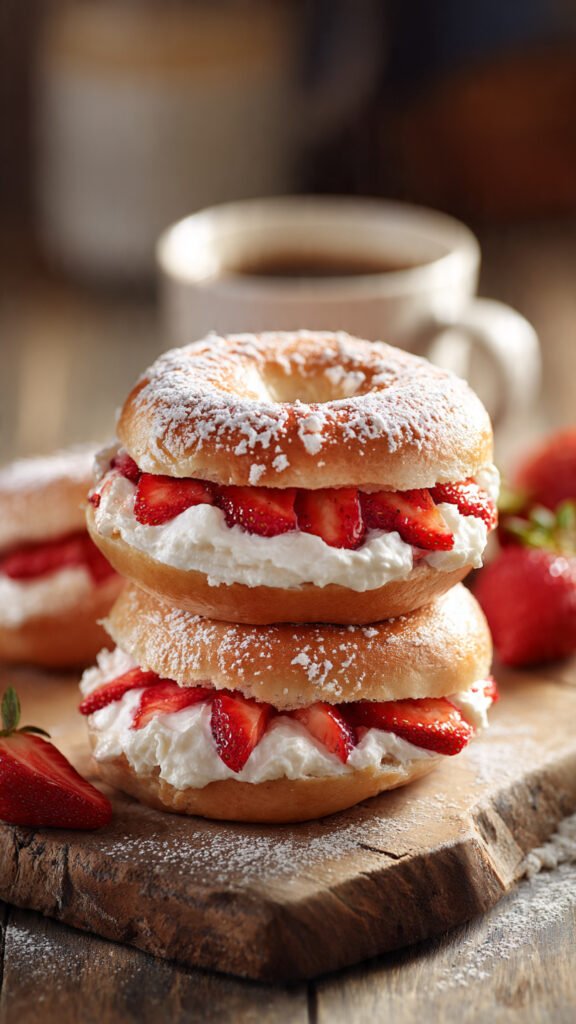
🍓 Best Homemade Strawberry Bagels Recipe | Chewy, Sweet & Easy!
Let’s get real for a second. You’re probably here because you saw a picture of a pink bagel on Instagram, or maybe you just woke up with a craving for something sweet, carb-loaded, and slightly more impressive than toast.
So you’re craving something tasty but too lazy to put on real pants and drive to the bakery, right? Same.
But here’s the secret: making bagels at home isn’t actually hard. People act like it’s this mystical art form reserved for bearded guys in Brooklyn aprons, but it’s really just playing with adult Play-Doh and then boiling it. Yes, boiling. If you’ve never boiled bread before, things are about to get weird, but trust me, the payoff is huge.
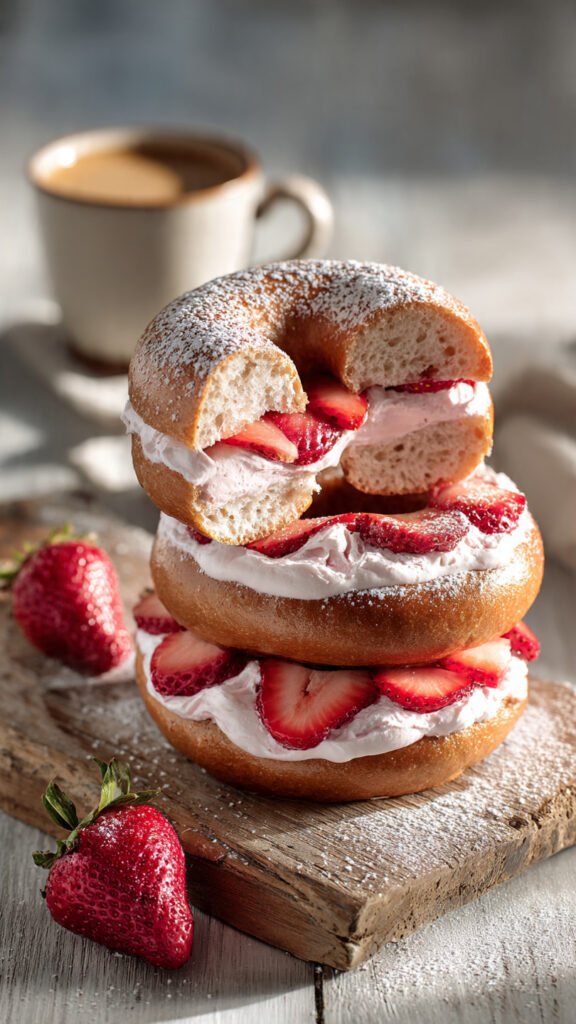
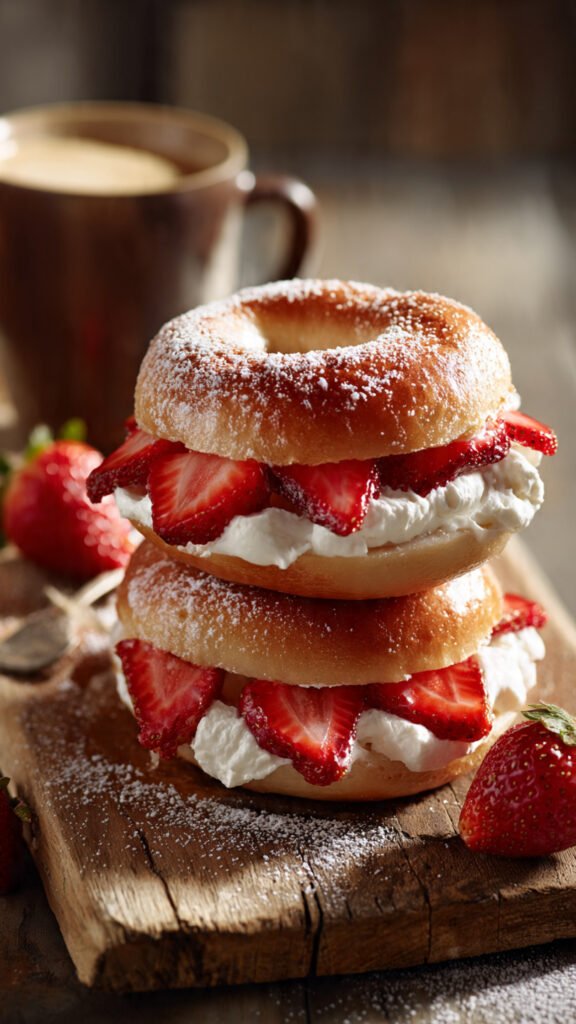
We are talking about a strawberry bagels recipe that results in a crispy, blistered outside and a chewy, dense, strawberry-scented inside that practically begs for a mountain of cream cheese. Let’s get baking.
Why This Recipe is Awesome
Look, I’ve eaten a lot of sad, grocery-store bagels in my life. You know the ones—they’re basically just round bread. They have no chew, no soul, and they taste like preservatives and cardboard.
This recipe? It’s the antidote to sadness.
- The Texture is Legit: We are using high-protein flour and a water bath to ensure you get that signature “pull” when you bite into it. If your jaw doesn’t get a mild workout, is it even a bagel?
- Real Strawberry Flavor: We aren’t just throwing in red food dye and praying. We are using real strawberries (with a specific trick I’ll share below) to get that punchy, tart-sweet flavor without turning the dough into a soggy mess.
- The “I Made This” Factor: There is nothing—and I mean nothing—cooler than pulling a tray of steaming, pink bagels out of the oven and telling your family or roommates, “Yeah, I just whipped these up.” You immediately become the main character of your kitchen.
- It’s Idiot-Proof: Okay, maybe not totally idiot-proof (please don’t touch the hot oven rack), but I’ve broken this down so clearly that even if your only culinary skill is boiling water for ramen, you can do this.
Ingredients You’ll Need
We are keeping this list relatively short, but quality matters here. Don’t try to swap things out willy-nilly unless you want sad, flat bagels.
- Bread Flour: Do not use All-Purpose flour. I repeat, put the AP flour down. You need the high protein content of bread flour (usually 12-14%) to develop the strong gluten strands that give bagels their chew. If you use AP flour, you’re making round dinner rolls.
- Freeze-Dried Strawberries: Here is the secret weapon. Fresh strawberries are full of water. Water is the enemy of bagel dough hydration. By pulverizing freeze-dried strawberries into a powder, we get intense flavor and neon pink color without messing up the dough consistency.
- Instant Yeast: The engine of the operation. Make sure it’s not expired. If your yeast has been sitting in the back of your pantry since 2018, toss it.
- Warm Water: Think “nice bath temperature,” not “volcano.” Around 110°F (43°C).
- Sugar & Honey: Sugar feeds the yeast; honey adds that subtle floral sweetness and helps the crust brown.
- Salt: Essential. Bread without salt tastes like disappointment.
- Vanilla Extract: Just a splash to bridge the gap between the yeast and the berries. It makes the kitchen smell like a bakery.
- Optional Red Food Coloring: The freeze-dried berries give a nice dusty rose color, but if you want that cartoon-bright pink, add a drop of gel color.
- For the Water Bath: Water (duh) and Barley Malt Syrup (or honey/molasses if you can’t find malt). This is what gives bagels their shine and distinct taste.
Step-by-Step Instructions
Okay, apron on. Wash your hands. Let’s make magic happen.
1. The Berry Prep
First, take your freeze-dried strawberries (about 1 cup) and blitz them in a food processor or blender until they are a fine powder. If you don’t have a blender, put them in a ziplock bag and smash them with a rolling pin like you’re working through some anger issues. Sift out any large chunks so you have a smooth powder.
2. Bloom the Yeast
In the bowl of your stand mixer (or a large bowl if you’re relying on arm strength), combine your warm water, sugar, and yeast. Give it a little whisk and let it sit for 5–10 minutes.
- Visual Cue: It should get foamy and bubbly. If it just sits there looking like dirty pond water, your yeast is dead. Start over.
3. Mix the Dough
Add the bread flour, strawberry powder, salt, vanilla, and optional food coloring to the yeast mixture.
- Stand Mixer: Use the dough hook on low speed.
- By Hand: Use a sturdy wooden spoon until it’s too hard to stir, then switch to your hands.
4. The Knead (A.K.A. The Workout)
This is the most important step.
- Stand Mixer: Knead on low/medium speed for about 7–10 minutes. The dough should clear the sides of the bowl completely.
- By Hand: Dump the dough onto a clean surface (no flour needed usually, this is a stiff dough). Knead for 10–15 minutes. Push the dough away with the heel of your hand, fold it back, turn, and repeat.
- The Test: You want the dough to be smooth, elastic, and satiny. It shouldn’t be sticky. If you press it with your finger, it should bounce back immediately like it’s offended you touched it.
5. The First Rise
Lightly grease a large bowl with oil (canola or vegetable spray). Plop your pink dough ball in, turn it over so it’s coated in oil, and cover with plastic wrap or a warm damp towel.
- Let it sit in a warm spot for 60–90 minutes. It should double in size.
- Pro Tip: If your kitchen is cold, stick the dough in the oven (turned OFF) with just the light on. It creates a perfect tropical microclimate.
6. Shape ‘Em Up
Punch the dough down (very satisfying). Divide the dough into 8 equal pieces.
- Ball Method: Roll each piece into a tight ball on the counter.
- The Hole: Stick your thumb right through the center of the ball. Gently stretch the dough out while rotating it around your thumb (like spinning a basketball, but clunkier) until the hole is about 1.5 to 2 inches wide. Remember, the hole shrinks when baking!
7. The Short Rest
Place your shaped bagels on a baking sheet lined with parchment paper. Cover them loosely and let them rest for 20 minutes. They will puff up slightly.
- Meanwhile: Preheat your oven to 425°F (220°C) and get a large pot of water boiling. Add 2 tablespoons of barley malt syrup (or honey) to the water.
8. The Boil
This is the science part. Boiling gelatinizes the starches on the surface of the dough, locking the shape and creating that chewy crust.
- Drop 2–3 bagels into the boiling water. Don’t crowd them; they need personal space.
- Boil for 1 minute on the first side, then flip and boil for 1 minute on the second side.
- Remove with a slotted spoon, drain the water, and place back on the baking sheet. They will look shriveled and ugly right now. That’s normal. Trust the process.
9. Bake to Perfection
Pop the tray into the oven. Bake for 20–25 minutes.
- They should be golden brown on top (or a deep, toasted pink).
- Cool on a wire rack for at least 15 minutes before cutting. If you cut a hot bagel, you crush the crumb and it becomes gummy. Patience, grasshopper.
Common Mistakes to Avoid
Listen, I’ve messed these up before so you don’t have to. Here is the “Fail List”:
- Using Fresh Strawberries (The Soggy Bottom): Fresh strawberries are 91% water. If you chop up fresh berries and throw them into bagel dough, the water will leach out during the rise, turning your dough into a sticky soup that won’t hold its shape. Stick to freeze-dried powder or a heavily reduced jam if you’re an expert.
- Skipping the Boil: “Can I just bake them?” No. If you just bake them, you have made pink hamburger buns. The boil is non-negotiable for that bagel chew.
- Under-Kneading: Bagel dough is tough. It requires a lot of gluten development. If you stop kneading because your arms are tired after 3 minutes, your bagels will be flat and dense (in a bad way). Power through the pain.
- Crowding the Pot: If you throw 6 bagels into the boiling water at once, the water temperature drops drastically. The starch won’t gelatinize correctly, and you’ll get soggy bagels.
Alternatives & Substitutions
Want to switch things up? Go for it.
- No Freeze-Dried Berries? If you can’t find them and refuse to order online, you can use strawberry jam. However, you must reduce the amount of water in the recipe significantly. Swap the sugar for 1/4 cup of high-quality strawberry preserves and reduce the water by about 2 tablespoons. It’s a bit riskier, but doable.
- The “Schmear” Upgrade: This strawberry bagels recipe is great, but the cream cheese is where the party is. Try mixing your plain cream cheese with a little honey and lemon zest. Or, go double-strawberry and mix strawberry jam into the cream cheese. Too much? Never.
- Vegan? This recipe is naturally almost vegan! Just swap the honey in the dough and the water bath for maple syrup or barley malt syrup. Boom. Plant-based carbs.
- Toppings: Before baking (right after the boil), you can brush with an egg wash and sprinkle on coarse sugar for a “crunch” top. It creates a nice textural contrast to the soft interior.
FAQ (Frequently Asked Questions)
1. Why are my bagels flat? Likely one of two things: either your yeast was old (R.I.P.), or you over-proofed them. If you let them rise too long, the yeast structure collapses. They should look puffy, not exhausted.
2. Can I freeze these? Absolutely! Slice them before you freeze them. That way, you can grab a frozen half and pop it straight into the toaster without needing a chainsaw to cut through a frozen block of bread. They last about 3 months in the freezer.
3. Why do I need Bread Flour? Can’t I just use All-Purpose? I feel like we covered this, but I’ll say it again for the people in the back: NO. Bread flour has more protein (gluten). Gluten = Chew. All-Purpose flour = Soft Cakey Bread. Technically edible, but spiritually incorrect for a bagel.
4. My dough is incredibly stiff and hard to knead. Is that wrong? Nope, that’s actually perfect! Bagel dough is low hydration (meaning less water ratio than sourdough or pizza dough). It’s supposed to be a tough little ball of dough. That stiffness is what allows it to hold that high, round shape during the boil.
5. Can I use a bread machine? You bet. Use the “Dough” setting to handle the mixing, kneading, and first rise. Then take it out, shape, boil, and bake manually. It’s a great way to save some elbow grease.
6. Why do they look wrinkled after boiling? Because you just tortured them in hot water! Don’t worry. Once they hit the oven heat, “oven spring” happens—they will puff back up and smooth out (mostly). A little character is good.
Final Thoughts
And there you have it. You have successfully navigated the world of yeast, gluten, and boiling water to create something beautiful.
Honestly, once you bite into a warm, toasted homemade bagel slathered in cream cheese, you’re going to wonder why you ever settled for the plastic-wrapped ones from the store. There is a specific pride in chewing on something you wrestled into existence with your own two hands.
This strawberry bagels recipe is perfect for Valentine’s Day, Mother’s Day, or just a random Tuesday when you need a pick-me-up.
Now go impress someone—or just yourself—with your new culinary skills. You’ve earned it!